Testing a Phoenix application with GitLab CI/CD
Phoenix is a web development framework written in Elixir, which is a functional language designed for productivity and maintainability that runs on the Erlang VM. Erlang VM is really really fast and can handle very large numbers of simultaneous users.
That's why we're hearing so much about Phoenix today.
In this tutorial, we'll teach you how to set up GitLab CI/CD to build and test a Phoenix application.
The tutorial assumes that you know how to create a Phoenix app, run tests locally, and how to work with Git and the GitLab UI.
Introduction
What is Phoenix?
Phoenix is a web development framework written in Elixir very useful to build fast, reliable, and high-performance applications, as it uses Erlang VM.
Many components and concepts are similar to Ruby on Rails or Python's Django. High developer productivity and high application performance are only a few advantages on learning how to use it. Working on the MVC pattern, it's was designed to be modular and flexible. Easy to maintain a growing app is a plus.
Phoenix can run in any OS where Erlang is supported:
- Ubuntu
- CentOS
- Mac OS X
- Debian
- Windows
- Fedora
- Raspbian
Check the Phoenix learning guide for more information.
What is Elixir?
Elixir is a dynamic, functional language created to use all the maturity of Erlang (30 years old!) in these days, in an easy way. It has similarities with Ruby, specially on syntax, so Ruby developers are quite excited with the rapid growing of Elixir. A full-stack Ruby developer can learn how to use Elixir and Phoenix in just a few weeks!
In Elixir we have a command called mix, which is a helper to create projects, testing, run
migrations and much more. We'll use it later on in this tutorial.
Check the Elixir documentation for more information.
Requirements
To follow this tutorial, you'll need to have installed:
- Elixir installation instructions
- Phoenix Framework installation instructions
- PostgreSQL (if you need to use MySQL server, check Phoenix instructions)
Create a new Phoenix project
Open your terminal and go to the directory you wish to create your project.
You don't need to create an empty directory for the project's files, because the mix command will
do it for us.
When we call mix command, we'll pass two arguments:
- The task we want it to run:
phoenix.new - And the parameter
phoenix.newrequires, which is the name of the new project. In this case, we're calling ithello_gitlab_ci, but you're free to set your own name:
mix phoenix.new hello_gitlab_ci
When asked, answer Y to fetch and install dependencies.
If everything went fine, you'll get an output like this:
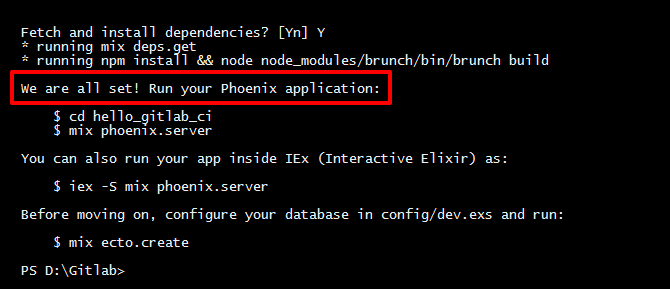
Now, our project is located inside the directory with the same name we pass to mix command, for
example, ~/GitLab/hello_gitlab_ci.
If we take a look at the directory, we'll see the Phoenix files and the dependencies needed to run.
Initialize the PostgreSQL database
By default, Phoenix requires a PostgreSQL database to store whatever we need to store in our app. In this case, we'll only create an empty database.
First, we need to navigate to our recently created project's directory, and then execute again
mix. This time, mix will receive the parameter ecto.create, which is the task to create our
new database. Ecto is the database wrapper for Elixir.
When we do run mix the first time after creating our project, it will compile our files to
bytecode, which will be interpreted by Erlang VM. In the next times, it will only compile our
changes.
Run the commands below to create our empty database:
cd hello_gitlab_ci
mix ecto.create
We expect to see this output at the end of the command:
Generated hello_gitlab_ci app
The database for HelloGitlabCi.Repo has been created
Note: Phoenix assumes that our PostgreSQL database will have a
postgresuser account with the correct permissions and a password ofpostgres. If it's not your case, check Ecto's instructions.
Start Phoenix server
Now, it's time to see if everything we did until now went well. We'll call mix again, this time
with phoenix.server parameter, which will start Phoenix's HTTP Server.
mix phoenix.server
This will be the output to this command:
[info] Running HelloGitlabCi.Endpoint with Cowboy using http://localhost:4000
23 May 11:44:35 - info: compiling
23 May 11:44:37 - info: compiled 6 files into 2 files, copied 3 in 9.8 sec
Now, we have our app running locally. We can preview it directly on our browser. Let's open
localhost:4000 to see our Phoenix Framework welcome page. If the link do
not work, open 127.0.0.1:4000 instead and later, configure your OS to
point localhost to 127.0.0.1.
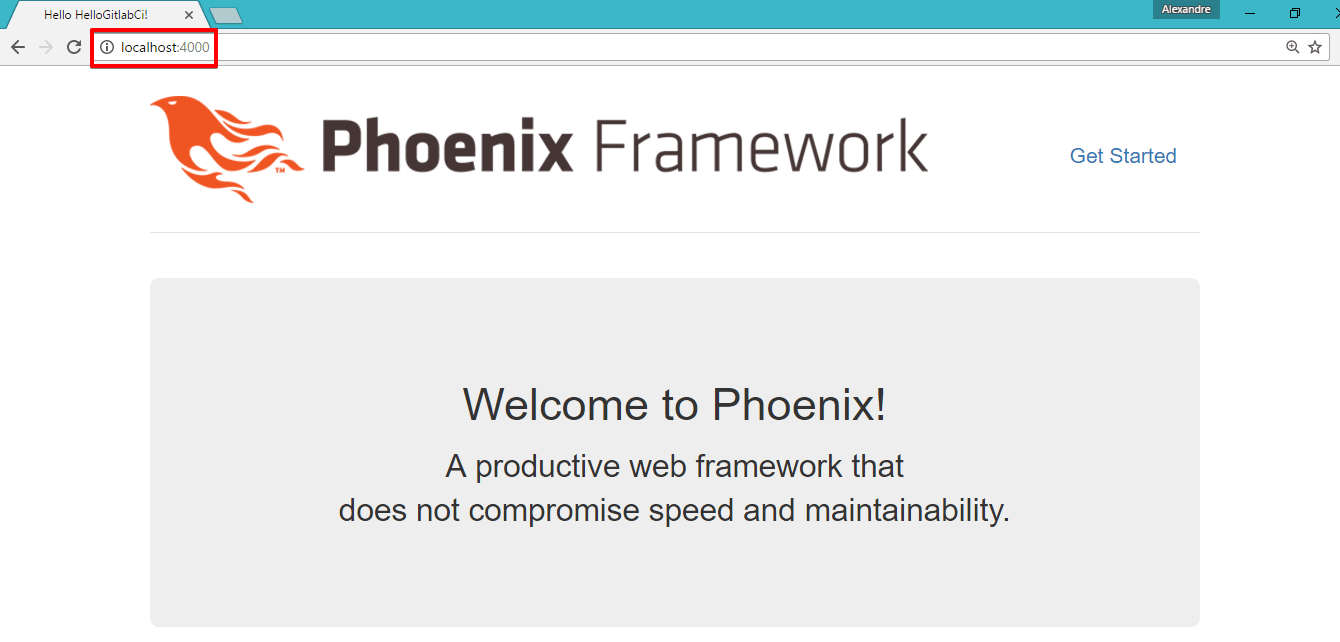
Great, now we have a local Phoenix Server running our app.
Locally, our application is running in an iex session. iex stands for Interactive Elixir.
In this interactive mode, we can type any Elixir expression and get its result. To exit iex, we
need to press Ctrl+C twice. So, when we need to stop the Phoenix server, we have to hit Ctrl+C
twice.
Introducing GitLab CI/CD
With GitLab, we can manage our development workflow, improve our productivity, track issues, perform code review, and much more from a single platform. With GitLab CI/CD, we can be much more productive, because every time we, or our co-workers push any code, GitLab CI/CD will build and test the changes, telling us in realtime if anything goes wrong.
Certainly, when our application starts to grow, we'll need more developers working on the same project and this process of building and testing can easily become a mess without proper management. That's also why GitLab CI/CD is so important to our application. Every time someone pushes its code to GitLab, we'll quickly know if their changes broke something or not. We don't need to stop everything we're doing to test manually and locally every change our team does.
Let's see this in practice.
Adjusting Phoenix configuration
Now, we need to adjust our Phoenix configuration before configuring GitLab CI/CD.
There is a directory (config) in your Phoenix project that contains a configuration file for every
environment it can run. Since we will work with a single environment, we'll edit just the test
configuration file (test.exs).
But, why do we need to adjust our configuration? Well, GitLab CI/CD builds and tests our code in one
isolated virtual machine, called Runner, using Docker technology. In this Runner,
GitLab CI/CD has access to everything our Phoenix application need to run, exactly as we have in our
localhost, but we have to tell GitLab CI/CD where to create and find this database using system
variables. This way, GitLab CI/CD will create our test database inside the Runner, just like we do
when running our Phoenix in our localhost.
- Open
hello_gitlab_ci/config/test.exson your favorite code editor - Go to Configure your database session and edit the block to include
System.get_env:
elixir
  # Configure your database
  config :hello_gitlab_ci, HelloGitlabCi.Repo,
    adapter: Ecto.Adapters.Postgres,
    username: System.get_env("POSTGRES_USER") || "postgres",
    password: System.get_env("POSTGRES_PASSWORD") || "postgres",
    database: System.get_env("POSTGRES_DB") || "hello_gitlab_ci_test",
    hostname: System.get_env("POSTGRES_HOST") || "localhost",
    pool: Ecto.Adapters.SQL.Sandbox
We'll need these system variables later on.
- Create an empty file named
.gitkeepintohello_gitlab_ci/priv/repo/migrations
As our project is still fresh, we don't have any data on our database, so, the migrations
directory will be empty.
Without .gitkeep, Git will not upload this empty directory and we'll got an error when running our
test on GitLab.
Note: If we add a folder via the GitLab UI, GitLab itself will add the
.gitkeepto that new dir.
Now, let's run a local test and see if everything we did didn't break anything.
Testing
Earlier, when we created our project, we ran mix phoenix.new.
This task created everything a Phoenix application needed, including some unit tests into
hello_gitlab_ci/test directory.
Let's run a new task with mix to run those tests for us. This time, the parameter expected is
test. We can add --trace parameter for debugging purposes.
In your terminal, navigate to the directory hello_gitlab_ci and run:
mix test
Our expected result is this:
....

Finished in 0.7 seconds
4 tests, 0 failures

Randomized with seed 610000
Our test was successful. It's time to push our files to GitLab.
Configuring CI/CD Pipeline
The first step is to create a new file called .gitlab-ci.yml in hello_gitlab_ci directory of our
project.
- The fastest and easiest way to do this, is to click on Set up CI on project's main page:

- On next screen, we can select a template ready to go. Click on Apply a GitLab CI/CD Yaml template and select Elixir:

This template file tells GitLab CI/CD about what we wish to do every time a new commit is made. However, we have to adapt it to run a Phoenix app.
- The first line tells GitLab what Docker image will be used.
Remember when we learn about Runners, the isolated virtual machine where GitLab CI/CD build and test our application? This virtual machine must have all dependencies to run our application. This is where a Docker image is needed. The correct image will provide the entire system for us.
As a suggestion, you can use trenpixster's elixir image, which already has all dependencies for Phoenix installed, such as Elixir, Erlang, NodeJS and PostgreSQL:
yml
  image: trenpixster/elixir:latest
- At
servicessession, we'll only usepostgres, so we'll deletemysqlandredislines:
yml
  services:
    - postgres:latest
- Now, we'll create a new entry called
variables, beforebefore_scriptsession:
yml
  variables:
    POSTGRES_DB: hello_gitlab_ci_test
    POSTGRES_HOST: postgres
    POSTGRES_USER: postgres
    POSTGRES_PASSWORD: "postgres"
    MIX_ENV: "test"
Here, we are setting up the values for GitLab CI/CD authenticate into PostgreSQL, as we did on
config/test.exs earlier.
- In
before_scriptsession, we'll add some commands to prepare everything to the test:
yml
  before_script:
    - apt-get update && apt-get -y install postgresql-client
    - mix local.hex --force
    - mix deps.get --only test
    - mix ecto.create
    - mix ecto.migrate
It's important to install postgresql-client to let GitLab CI/CD access PostgreSQL and create our
database with the login information provided earlier. More important is to respect the indentation,
to avoid syntax errors when running the build.
- And finally, we'll let
mixsession intact.
Let's take a look at the completed file after the editions:
image: trenpixster/elixir:latest

services:
  - postgres:latest

variables:
  POSTGRES_DB: test_test
  POSTGRES_HOST: postgres
  POSTGRES_USER: postgres
  POSTGRES_PASSWORD: "postgres"
  MIX_ENV: "test"

before_script:
  - apt-get update && apt-get -y install postgresql-client
  - mix deps.get
  - mix ecto.create
  - mix ecto.migrate

mix:
  script:
  - mix test
For safety, we can check if we get any syntax errors before submitting this file to GitLab. Copy the
contents of .gitlab-ci.yml and paste it on GitLab CI/CD Lint tool. Please note that
this link will only work for logged in users.
Watching the build
I don't know about you, but I love to watch that black screen being filled with compilation output.
With this, I can feel the happiness of something I made working correctly. On localhost it's easy
to watch our build, but on GitLab, is it possible? Yes!
Let's go to Pipelines and see GitLab doing the job. Just click on Pipelines to find the actual running build job.
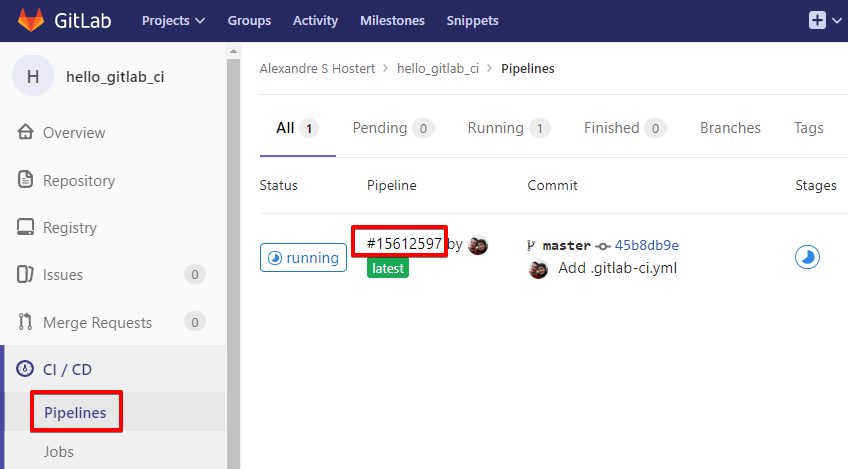
Click on build's ID to watch the entire process. If everything went as expected, we can wait for the Build succeeded at the end of the process! :)
$ mix test
....

Finished in 0.3 seconds
4 tests, 0 failures

Randomized with seed 206909
Build succeeded
If we take a look at the project's main page on the GitLab UI, we can see the status of the last build made by GitLab CI/CD.
Time to show the world our green build badge! Navigate to your project's Settings > CI/CD and
expand General pipelines settings. Scroll down to Pipeline status and copy the Markdown code
for your badge. Paste it on the top of your README.md file, to let people outside of our project
see if our latest code is running without errors.
When we finish this edition, GitLab will start another build and show a build running badge. It
is expected, after all we just configured GitLab CI/CD to do this for every push! But you may think
"Why run build and tests for simple things like editing README.md?" and it is a good question.
For changes that don't affect your application, you can add the keyword [ci skip]
to commit message and the build related to that commit will be skipped.
In the end, we finally got our pretty green build succeeded badge! By outputting the result on the README file, it shows to whoever lands on your project's page that your code is up-to-date and working properly.
Conclusion
When we have a growing application with many developers working on it, or when we have an open source project being watched and contributed by the community, it is really important to have our code permanently working. GitLab CI/CD is a time saving powerful tool to help us maintain our code organized and working.
As we could see in this post, GitLab CI/CD is really really easy to configure and use. We have many other reasons to keep using GitLab CI/CD. The benefits to our teams will be huge!