Configuring PostgreSQL for Scaling and High Availability
In this section, you'll be guided through configuring a PostgreSQL database to be used with GitLab in a highly available environment.
Provide your own PostgreSQL instance (CORE ONLY)
If you're hosting GitLab on a cloud provider, you can optionally use a managed service for PostgreSQL. For example, AWS offers a managed Relational Database Service (RDS) that runs PostgreSQL.
If you use a cloud-managed service, or provide your own PostgreSQL:
- Set up PostgreSQL according to the database requirements document.
- Set up a
gitlabusername with a password of your choice. Thegitlabuser needs privileges to create thegitlabhq_productiondatabase. - Configure the GitLab application servers with the appropriate details. This step is covered in Configuring GitLab for HA.
PostgreSQL in a Scaled Environment
This section is relevant for Scaled Architecture environments including Basic Scaling and Full Scaling.
Provide your own PostgreSQL instance (CORE ONLY)
If you want to use your own deployed PostgreSQL instance(s), see Provide your own PostgreSQL instance for more details. However, you can use the GitLab Omnibus package to easily deploy the bundled PostgreSQL.
Standalone PostgreSQL using GitLab Omnibus (CORE ONLY)
- SSH into the PostgreSQL server.
- Download/install the Omnibus GitLab package you want using steps 1 and 2 from the GitLab downloads page.
- Do not complete any other steps on the download page.
- Generate a password hash for PostgreSQL. This assumes you will use the default
username of
gitlab(recommended). The command will request a password and confirmation. Use the value that is output by this command in the next step as the value ofPOSTGRESQL_PASSWORD_HASH.
sh
   sudo gitlab-ctl pg-password-md5 gitlab
-
Edit
/etc/gitlab/gitlab.rband add the contents below, updating placeholder values appropriately. -
POSTGRESQL_PASSWORD_HASH- The value output from the previous step APPLICATION_SERVER_IP_BLOCKS- A space delimited list of IP subnets or IP addresses of the GitLab application servers that will connect to the database. Example:%w(123.123.123.123/32 123.123.123.234/32)
```ruby # Disable all components except PostgreSQL roles ['postgres_role'] repmgr['enable'] = false consul['enable'] = false prometheus['enable'] = false alertmanager['enable'] = false pgbouncer_exporter['enable'] = false redis_exporter['enable'] = false gitlab_exporter['enable'] = false
postgresql['listen_address'] = '0.0.0.0' postgresql['port'] = 5432
# Replace POSTGRESQL_PASSWORD_HASH with a generated md5 value postgresql['sql_user_password'] = 'POSTGRESQL_PASSWORD_HASH'
# Replace XXX.XXX.XXX.XXX/YY with Network Address # ???? postgresql['trust_auth_cidr_addresses'] = %w(APPLICATION_SERVER_IP_BLOCKS)
# Disable automatic database migrations gitlab_rails['auto_migrate'] = false ```
NOTE: Note: The role postgres_role was introduced with GitLab 10.3
- Reconfigure GitLab for the changes to take effect.
- Note the PostgreSQL node's IP address or hostname, port, and plain text password. These will be necessary when configuring the GitLab application servers later.
- Enable monitoring
Advanced configuration options are supported and can be added if needed.
Continue configuration of other components by going back to Scaled Architectures
PostgreSQL with High Availability
This section is relevant for High Availability Architecture environments including Horizontal, Hybrid, and Fully Distributed.
Provide your own PostgreSQL instance (CORE ONLY)
If you want to use your own deployed PostgreSQL instance(s), see Provide your own PostgreSQL instance for more details. However, you can use the GitLab Omnibus package to easily deploy the bundled PostgreSQL.
High Availability with GitLab Omnibus (PREMIUM ONLY)
Important notes:
- This document will focus only on configuration supported with GitLab Premium, using the Omnibus GitLab package.
- If you are a Community Edition or Starter user, consider using a cloud hosted solution.
This document will not cover installations from source.
If HA setup is not what you were looking for, see the database configuration document for the Omnibus GitLab packages.
Please read this document fully before attempting to configure PostgreSQL HA for GitLab.
This configuration is GA in EE 10.2.
The recommended configuration for a PostgreSQL HA requires:
- A minimum of three database nodes
- Each node will run the following services:
PostgreSQL- The database itselfrepmgrd- A service to monitor, and handle failover in case of a failureConsulagent - Used for service discovery, to alert other nodes when failover occurs
- A minimum of three
Consulserver nodes - A minimum of one
pgbouncerservice node, but it's recommended to have one per database node - An internal load balancer (TCP) is required when there is more than one
pgbouncerservice node
You also need to take into consideration the underlying network topology, making sure you have redundant connectivity between all Database and GitLab instances, otherwise the networks will become a single point of failure.
Architecture
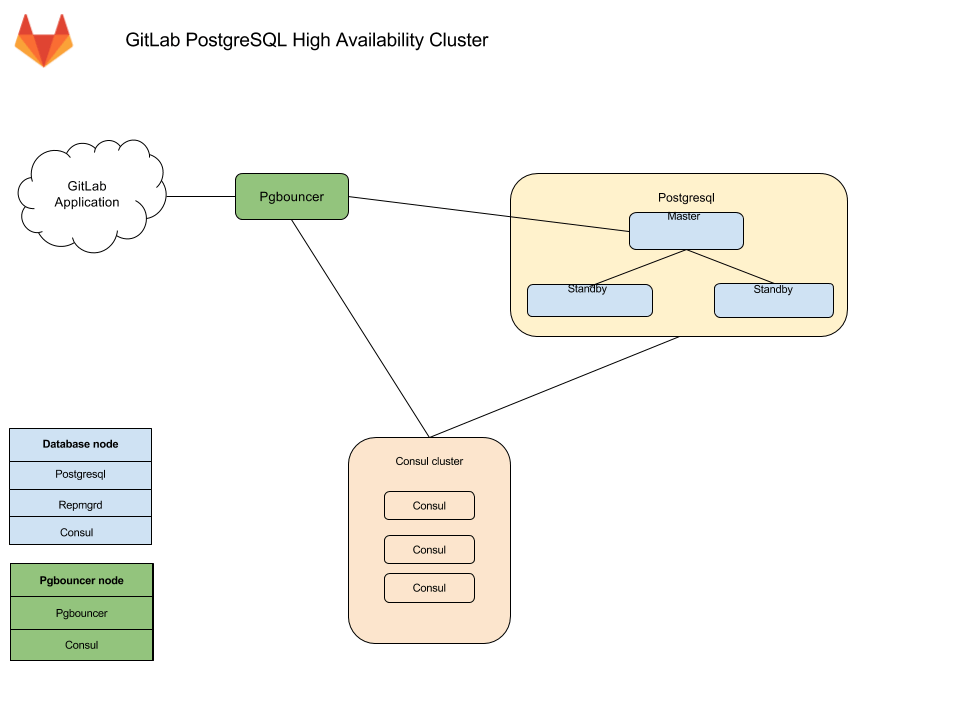
Database nodes run two services with PostgreSQL:
- Repmgrd. Monitors the cluster and handles failover when issues with the master occur. The failover consists of:
- Selecting a new master for the cluster.
- Promoting the new node to master.
- Instructing remaining servers to follow the new master node.
On failure, the old master node is automatically evicted from the cluster, and should be rejoined manually once recovered. - Consul. Monitors the status of each node in the database cluster and tracks its health in a service definition on the Consul cluster.
Alongside each PgBouncer, there is a Consul agent that watches the status of the PostgreSQL service. If that status changes, Consul runs a script which updates the configuration and reloads PgBouncer
Connection flow
Each service in the package comes with a set of default ports. You may need to make specific firewall rules for the connections listed below:
- Application servers connect to either PgBouncer directly via its default port or via a configured Internal Load Balancer (TCP) that serves multiple PgBouncers.
- PgBouncer connects to the primary database servers PostgreSQL default port
- Repmgr connects to the database servers PostgreSQL default port
- Postgres secondaries connect to the primary database servers PostgreSQL default port
- Consul servers and agents connect to each others Consul default ports
Required information
Before proceeding with configuration, you will need to collect all the necessary information.
Network information
PostgreSQL does not listen on any network interface by default. It needs to know which IP address to listen on in order to be accessible to other services. Similarly, PostgreSQL access is controlled based on the network source.
This is why you will need:
- IP address of each nodes network interface. This can be set to
0.0.0.0to listen on all interfaces. It cannot be set to the loopack address127.0.0.1. - Network Address. This can be in subnet (i.e.
192.168.0.0/255.255.255.0) or CIDR (i.e.192.168.0.0/24) form.
User information
Various services require different configuration to secure the communication as well as information required for running the service. Bellow you will find details on each service and the minimum required information you need to provide.
Consul information
When using default setup, minimum configuration requires:
CONSUL_USERNAME. Defaults togitlab-consulCONSUL_DATABASE_PASSWORD. Password for the database user.CONSUL_PASSWORD_HASH. This is a hash generated out of Consul username/password pair. Can be generated with:
sh
   sudo gitlab-ctl pg-password-md5 CONSUL_USERNAME
CONSUL_SERVER_NODES. The IP addresses or DNS records of the Consul server nodes.
Few notes on the service itself:
- The service runs under a system account, by default
gitlab-consul. - If you are using a different username, you will have to specify it. We
will refer to it with
CONSUL_USERNAME, - There will be a database user created with read only access to the repmgr database
- Passwords will be stored in the following locations:
/etc/gitlab/gitlab.rb: hashed/var/opt/gitlab/pgbouncer/pg_auth: hashed/var/opt/gitlab/gitlab-consul/.pgpass: plaintext
PostgreSQL information
When configuring PostgreSQL, we will set max_wal_senders to one more than
the number of database nodes in the cluster.
This is used to prevent replication from using up all of the
available database connections.
In this document we are assuming 3 database nodes, which makes this configuration:
postgresql['max_wal_senders'] = 4
As previously mentioned, you'll have to prepare the network subnets that will be allowed to authenticate with the database. You'll also need to supply the IP addresses or DNS records of Consul server nodes.
We will need the following password information for the application's database user:
POSTGRESQL_USERNAME. Defaults togitlabPOSTGRESQL_USER_PASSWORD. The password for the database userPOSTGRESQL_PASSWORD_HASH. This is a hash generated out of the username/password pair. Can be generated with:
sh
  sudo gitlab-ctl pg-password-md5 POSTGRESQL_USERNAME
PgBouncer information
When using default setup, minimum configuration requires:
PGBOUNCER_USERNAME. Defaults topgbouncerPGBOUNCER_PASSWORD. This is a password for PgBouncer service.PGBOUNCER_PASSWORD_HASH. This is a hash generated out of PgBouncer username/password pair. Can be generated with:
sh
  sudo gitlab-ctl pg-password-md5 PGBOUNCER_USERNAME
PGBOUNCER_NODE, is the IP address or a FQDN of the node running PgBouncer.
Few notes on the service itself:
- The service runs as the same system account as the database
- In the package, this is by default
gitlab-psql - If you use a non-default user account for PgBouncer service (by default
pgbouncer), you will have to specify this username. We will refer to this requirement withPGBOUNCER_USERNAME. - The service will have a regular database user account generated for it
- This defaults to
repmgr - Passwords will be stored in the following locations:
/etc/gitlab/gitlab.rb: hashed, and in plain text/var/opt/gitlab/pgbouncer/pg_auth: hashed
Repmgr information
When using default setup, you will only have to prepare the network subnets that will be allowed to authenticate with the service.
Few notes on the service itself:
- The service runs under the same system account as the database
- In the package, this is by default
gitlab-psql - The service will have a superuser database user account generated for it
- This defaults to
gitlab_repmgr
Installing Omnibus GitLab
First, make sure to download/install GitLab Omnibus on each node.
Make sure you install the necessary dependencies from step 1,
add GitLab package repository from step 2.
When installing the GitLab package, do not supply EXTERNAL_URL value.
Configuring the Database nodes
- Make sure to configure the Consul nodes.
-
Make sure you collect
CONSUL_SERVER_NODES,PGBOUNCER_PASSWORD_HASH,POSTGRESQL_PASSWORD_HASH, the number of db nodes, and the network address before executing the next step. -
On the master database node, edit
/etc/gitlab/gitlab.rbreplacing values noted in the# START user configurationsection:
```ruby # Disable all components except PostgreSQL and Repmgr and Consul roles ['postgres_role']
# PostgreSQL configuration postgresql['listen_address'] = '0.0.0.0' postgresql['hot_standby'] = 'on' postgresql['wal_level'] = 'replica' postgresql['shared_preload_libraries'] = 'repmgr_funcs'
# Disable automatic database migrations gitlab_rails['auto_migrate'] = false
# Configure the Consul agent consul['services'] = %w(postgresql)
# START user configuration # Please set the real values as explained in Required Information section # # Replace PGBOUNCER_PASSWORD_HASH with a generated md5 value postgresql['pgbouncer_user_password'] = 'PGBOUNCER_PASSWORD_HASH' # Replace POSTGRESQL_PASSWORD_HASH with a generated md5 value postgresql['sql_user_password'] = 'POSTGRESQL_PASSWORD_HASH' # Replace X with value of number of db nodes + 1 postgresql['max_wal_senders'] = X postgresql['max_replication_slots'] = X
# Replace XXX.XXX.XXX.XXX/YY with Network Address postgresql['trust_auth_cidr_addresses'] = %w(XXX.XXX.XXX.XXX/YY) repmgr['trust_auth_cidr_addresses'] = %w(127.0.0.1/32 XXX.XXX.XXX.XXX/YY)
# Replace placeholders: # # Y.Y.Y.Y consul1.gitlab.example.com Z.Z.Z.Z # with the addresses gathered for CONSUL_SERVER_NODES consul['configuration'] = { retry_join: %w(Y.Y.Y.Y consul1.gitlab.example.com Z.Z.Z.Z) } # # END user configuration ```
postgres_rolewas introduced with GitLab 10.3
- On secondary nodes, add all the configuration specified above for primary node
to
/etc/gitlab/gitlab.rb. In addition, append the following configuration to informgitlab-ctlthat they are standby nodes initially and it need not attempt to register them as primary node
# HA setting to specify if a node should attempt to be master on initialization
   repmgr['master_on_initialization'] = false
- Reconfigure GitLab for the changes to take effect.
- Enable Monitoring
Please note:
- If you want your database to listen on a specific interface, change the config:
postgresql['listen_address'] = '0.0.0.0'.- If your PgBouncer service runs under a different user account, you also need to specify:
postgresql['pgbouncer_user'] = PGBOUNCER_USERNAMEin your configuration.
Database nodes post-configuration
Primary node
Select one node as a primary node.
- Open a database prompt:
sh
   gitlab-psql -d gitlabhq_production
- Enable the
pg_trgmextension:
sh
   CREATE EXTENSION pg_trgm;
-
Exit the database prompt by typing
\qand Enter. -
Verify the cluster is initialized with one node:
sh
   gitlab-ctl repmgr cluster show
The output should be similar to the following:
Role      | Name     | Upstream | Connection String
   ----------+----------|----------|----------------------------------------
   * master  | HOSTNAME |          | host=HOSTNAME user=gitlab_repmgr dbname=gitlab_repmgr
- Note down the hostname/ip in the connection string:
host=HOSTNAME. We will refer to the hostname in the next section asMASTER_NODE_NAME. If the value is not an IP address, it will need to be a resolvable name (via DNS or/etc/hosts)
Secondary nodes
- Set up the repmgr standby:
sh
   gitlab-ctl repmgr standby setup MASTER_NODE_NAME
Do note that this will remove the existing data on the node. The command has a wait time.
The output should be similar to the following:
console
   # gitlab-ctl repmgr standby setup MASTER_NODE_NAME
   Doing this will delete the entire contents of /var/opt/gitlab/postgresql/data
   If this is not what you want, hit Ctrl-C now to exit
   To skip waiting, rerun with the -w option
   Sleeping for 30 seconds
   Stopping the database
   Removing the data
   Cloning the data
   Starting the database
   Registering the node with the cluster
   ok: run: repmgrd: (pid 19068) 0s
- Verify the node now appears in the cluster:
sh
   gitlab-ctl repmgr cluster show
The output should be similar to the following:
Role      | Name    | Upstream  | Connection String
   ----------+---------|-----------|------------------------------------------------
   * master  | MASTER  |           | host=MASTER_NODE_NAME user=gitlab_repmgr dbname=gitlab_repmgr
     standby | STANDBY | MASTER    | host=STANDBY_HOSTNAME user=gitlab_repmgr dbname=gitlab_repmgr
Repeat the above steps on all secondary nodes.
Database checkpoint
Before moving on, make sure the databases are configured correctly. Run the following command on the primary node to verify that replication is working properly:
gitlab-ctl repmgr cluster show
The output should be similar to:
Role      | Name         | Upstream     | Connection String
----------+--------------|--------------|--------------------------------------------------------------------
* master  | MASTER  |        | host=MASTER port=5432 user=gitlab_repmgr dbname=gitlab_repmgr
  standby | STANDBY | MASTER | host=STANDBY port=5432 user=gitlab_repmgr dbname=gitlab_repmgr
If the 'Role' column for any node says "FAILED", check the Troubleshooting section before proceeding.
Also, check that the check master command works successfully on each node:
su - gitlab-consul
gitlab-ctl repmgr-check-master || echo 'This node is a standby repmgr node'
This command relies on exit codes to tell Consul whether a particular node is a master
or secondary. The most important thing here is that this command does not produce errors.
If there are errors it's most likely due to incorrect gitlab-consul database user permissions.
Check the Troubleshooting section before proceeding.
Configuring the PgBouncer node
See our documentation for PgBouncer for information on running PgBouncer as part of an HA setup.
Configuring the Application nodes
These will be the nodes running the gitlab-rails service. You may have other
attributes set, but the following need to be set.
- Edit
/etc/gitlab/gitlab.rb:
```ruby # Disable PostgreSQL on the application node postgresql['enable'] = false
gitlab_rails['db_host'] = 'PGBOUNCER_NODE' or 'INTERNAL_LOAD_BALANCER' gitlab_rails['db_port'] = 6432 gitlab_rails['db_password'] = 'POSTGRESQL_USER_PASSWORD' gitlab_rails['auto_migrate'] = false ```
- Reconfigure GitLab for the changes to take effect.
Application node post-configuration
Ensure that all migrations ran:
gitlab-rake gitlab:db:configure
Note: If you encounter a
rake aborted!error stating that PgBouncer is failing to connect to PostgreSQL it may be that your PgBouncer node's IP address is missing from PostgreSQL'strust_auth_cidr_addressesingitlab.rbon your database nodes. See PgBouncer errorERROR: pgbouncer cannot connect to serverin the Troubleshooting section before proceeding.
Ensure GitLab is running
At this point, your GitLab instance should be up and running. Verify you are able to login, and create issues and merge requests. If you have troubles check the Troubleshooting section.
Example configuration
Here we'll show you some fully expanded example configurations.
Example recommended setup
This example uses 3 Consul servers, 3 PgBouncer servers (with associated internal load balancer), 3 PostgreSQL servers, and 1 application node.
We start with all servers on the same 10.6.0.0/16 private network range, they can connect to each freely other on those addresses.
Here is a list and description of each machine and the assigned IP:
10.6.0.11: Consul 110.6.0.12: Consul 210.6.0.13: Consul 310.6.0.20: Internal Load Balancer10.6.0.21: PgBouncer 110.6.0.22: PgBouncer 210.6.0.23: PgBouncer 310.6.0.31: PostgreSQL master10.6.0.32: PostgreSQL secondary10.6.0.33: PostgreSQL secondary10.6.0.41: GitLab application
All passwords are set to toomanysecrets, please do not use this password or derived hashes and the external_url for GitLab is http://gitlab.example.com.
Please note that after the initial configuration, if a failover occurs, the PostgresSQL master will change to one of the available secondaries until it is failed back.
Example recommended setup for Consul servers
On each server edit /etc/gitlab/gitlab.rb:
# Disable all components except Consul
roles ['consul_role']

consul['configuration'] = {
  server: true,
  retry_join: %w(10.6.0.11 10.6.0.12 10.6.0.13)
}
consul['monitoring_service_discovery'] =  true
Reconfigure Omnibus GitLab for the changes to take effect.
Example recommended setup for PgBouncer servers
On each server edit /etc/gitlab/gitlab.rb:
# Disable all components except Pgbouncer and Consul agent
roles ['pgbouncer_role']

# Configure PgBouncer
pgbouncer['admin_users'] = %w(pgbouncer gitlab-consul)

pgbouncer['users'] = {
  'gitlab-consul': {
    password: '5e0e3263571e3704ad655076301d6ebe'
  },
  'pgbouncer': {
    password: '771a8625958a529132abe6f1a4acb19c'
  }
}

consul['watchers'] = %w(postgresql)
consul['enable'] = true
consul['configuration'] = {
  retry_join: %w(10.6.0.11 10.6.0.12 10.6.0.13)
}
consul['monitoring_service_discovery'] =  true
Reconfigure Omnibus GitLab for the changes to take effect.
Internal load balancer setup
An internal load balancer (TCP) is then required to be setup to serve each PgBouncer node (in this example on the IP of 10.6.0.20). An example of how to do this can be found in the PgBouncer Configure Internal Load Balancer section.
Example recommended setup for PostgreSQL servers
Primary node
On primary node edit /etc/gitlab/gitlab.rb:
# Disable all components except PostgreSQL and Repmgr and Consul
roles ['postgres_role']

# PostgreSQL configuration
postgresql['listen_address'] = '0.0.0.0'
postgresql['hot_standby'] = 'on'
postgresql['wal_level'] = 'replica'
postgresql['shared_preload_libraries'] = 'repmgr_funcs'

# Disable automatic database migrations
gitlab_rails['auto_migrate'] = false

postgresql['pgbouncer_user_password'] = '771a8625958a529132abe6f1a4acb19c'
postgresql['sql_user_password'] = '450409b85a0223a214b5fb1484f34d0f'
postgresql['max_wal_senders'] = 4

postgresql['trust_auth_cidr_addresses'] = %w(10.6.0.0/16)
repmgr['trust_auth_cidr_addresses'] = %w(10.6.0.0/16)

# Configure the Consul agent
consul['services'] = %w(postgresql)
consul['enable'] = true
consul['configuration'] = {
  retry_join: %w(10.6.0.11 10.6.0.12 10.6.0.13)
}
consul['monitoring_service_discovery'] =  true
Reconfigure Omnibus GitLab for the changes to take effect.
Secondary nodes
On secondary nodes, edit /etc/gitlab/gitlab.rb and add all the configuration
added to primary node, noted above. In addition, append the following
configuration:
# HA setting to specify if a node should attempt to be master on initialization
repmgr['master_on_initialization'] = false
Reconfigure Omnibus GitLab for the changes to take effect.
Example recommended setup for application server
On the server edit /etc/gitlab/gitlab.rb:
external_url 'http://gitlab.example.com'

gitlab_rails['db_host'] = '10.6.0.20' # Internal Load Balancer for PgBouncer nodes
gitlab_rails['db_port'] = 6432
gitlab_rails['db_password'] = 'toomanysecrets'
gitlab_rails['auto_migrate'] = false

postgresql['enable'] = false
pgbouncer['enable'] = false
consul['enable'] = true

# Configure Consul agent
consul['watchers'] = %w(postgresql)

pgbouncer['users'] = {
  'gitlab-consul': {
    password: '5e0e3263571e3704ad655076301d6ebe'
  },
  'pgbouncer': {
    password: '771a8625958a529132abe6f1a4acb19c'
  }
}

consul['configuration'] = {
  retry_join: %w(10.6.0.11 10.6.0.12 10.6.0.13)
}
Reconfigure Omnibus GitLab for the changes to take effect.
Example recommended setup manual steps
After deploying the configuration follow these steps:
- On
10.6.0.31, our primary database
Enable the pg_trgm extension
sh
   gitlab-psql -d gitlabhq_production
CREATE EXTENSION pg_trgm;
- On
10.6.0.32, our first standby database
Make this node a standby of the primary
sh
   gitlab-ctl repmgr standby setup 10.6.0.21
- On
10.6.0.33, our second standby database
Make this node a standby of the primary
sh
   gitlab-ctl repmgr standby setup 10.6.0.21
- On
10.6.0.41, our application server
Set gitlab-consul user's PgBouncer password to toomanysecrets
sh
   gitlab-ctl write-pgpass --host 127.0.0.1 --database pgbouncer --user pgbouncer --hostuser gitlab-consul
Run database migrations
sh
   gitlab-rake gitlab:db:configure
Example minimal setup
This example uses 3 PostgreSQL servers, and 1 application node (with PgBouncer setup alongside).
It differs from the recommended setup by moving the Consul servers into the same servers we use for PostgreSQL. The trade-off is between reducing server counts, against the increased operational complexity of needing to deal with PostgreSQL failover and restore procedures in addition to Consul outage recovery on the same set of machines.
In this example we start with all servers on the same 10.6.0.0/16 private network range, they can connect to each freely other on those addresses.
Here is a list and description of each machine and the assigned IP:
10.6.0.21: PostgreSQL master10.6.0.22: PostgreSQL secondary10.6.0.23: PostgreSQL secondary10.6.0.31: GitLab application
All passwords are set to toomanysecrets, please do not use this password or derived hashes.
The external_url for GitLab is http://gitlab.example.com
Please note that after the initial configuration, if a failover occurs, the PostgresSQL master will change to one of the available secondaries until it is failed back.
Example minimal configuration for database servers
Primary node
On primary database node edit /etc/gitlab/gitlab.rb:
# Disable all components except PostgreSQL, Repmgr, and Consul
roles ['postgres_role']

# PostgreSQL configuration
postgresql['listen_address'] = '0.0.0.0'
postgresql['hot_standby'] = 'on'
postgresql['wal_level'] = 'replica'
postgresql['shared_preload_libraries'] = 'repmgr_funcs'

# Disable automatic database migrations
gitlab_rails['auto_migrate'] = false

# Configure the Consul agent
consul['services'] = %w(postgresql)

postgresql['pgbouncer_user_password'] = '771a8625958a529132abe6f1a4acb19c'
postgresql['sql_user_password'] = '450409b85a0223a214b5fb1484f34d0f'
postgresql['max_wal_senders'] = 4

postgresql['trust_auth_cidr_addresses'] = %w(10.6.0.0/16)
repmgr['trust_auth_cidr_addresses'] = %w(10.6.0.0/16)

consul['configuration'] = {
  server: true,
  retry_join: %w(10.6.0.21 10.6.0.22 10.6.0.23)
}
Reconfigure Omnibus GitLab for the changes to take effect.
Secondary nodes
On secondary nodes, edit /etc/gitlab/gitlab.rb and add all the information added
to primary node, noted above. In addition, append the following configuration
# HA setting to specify if a node should attempt to be master on initialization
repmgr['master_on_initialization'] = false
Example minimal configuration for application server
On the server edit /etc/gitlab/gitlab.rb:
external_url 'http://gitlab.example.com'

gitlab_rails['db_host'] = '127.0.0.1'
gitlab_rails['db_port'] = 6432
gitlab_rails['db_password'] = 'toomanysecrets'
gitlab_rails['auto_migrate'] = false

postgresql['enable'] = false
pgbouncer['enable'] = true
consul['enable'] = true

# Configure PgBouncer
pgbouncer['admin_users'] = %w(pgbouncer gitlab-consul)

# Configure Consul agent
consul['watchers'] = %w(postgresql)

pgbouncer['users'] = {
  'gitlab-consul': {
    password: '5e0e3263571e3704ad655076301d6ebe'
  },
  'pgbouncer': {
    password: '771a8625958a529132abe6f1a4acb19c'
  }
}

consul['configuration'] = {
  retry_join: %w(10.6.0.21 10.6.0.22 10.6.0.23)
}
Reconfigure Omnibus GitLab for the changes to take effect.
Example minimal setup manual steps
The manual steps for this configuration are the same as for the example recommended setup.
Failover procedure
By default, if the master database fails, repmgrd should promote one of the
standby nodes to master automatically, and Consul will update PgBouncer with
the new master.
If you need to failover manually, you have two options:
Shutdown the current master database
Run:
gitlab-ctl stop postgresql
The automated failover process will see this and failover to one of the standby nodes.
Or perform a manual failover
- Ensure the old master node is not still active.
- Login to the server that should become the new master and run:
sh
   gitlab-ctl repmgr standby promote
- If there are any other standby servers in the cluster, have them follow the new master server:
sh
   gitlab-ctl repmgr standby follow NEW_MASTER
Restore procedure
If a node fails, it can be removed from the cluster, or added back as a standby after it has been restored to service.
- If you want to remove the node from the cluster, on any other node in the cluster, run:
sh
  gitlab-ctl repmgr standby unregister --node=X
where X is the value of node in repmgr.conf on the old server.
To find this, you can use:
sh
  awk -F = '$1 == "node" { print $2 }' /var/opt/gitlab/postgresql/repmgr.conf
It will output something like:
959789412
Then you will use this id to unregister the node:
sh
  gitlab-ctl repmgr standby unregister --node=959789412
- To add the node as a standby server:
sh
  gitlab-ctl repmgr standby follow NEW_MASTER
  gitlab-ctl restart repmgrd
CAUTION: Warning: When the server is brought back online, and before
you switch it to a standby node, repmgr will report that there are two masters.
If there are any clients that are still attempting to write to the old master,
this will cause a split, and the old master will need to be resynced from
scratch by performing a gitlab-ctl repmgr standby setup NEW_MASTER.
Alternate configurations
Database authorization
By default, we give any host on the database network the permission to perform
repmgr operations using PostgreSQL's trust method. If you do not want this
level of trust, there are alternatives.
You can trust only the specific nodes that will be database clusters, or you can require md5 authentication.
Trust specific addresses
If you know the IP address, or FQDN of all database and PgBouncer nodes in the cluster, you can trust only those nodes.
In /etc/gitlab/gitlab.rb on all of the database nodes, set
repmgr['trust_auth_cidr_addresses'] to an array of strings containing all of
the addresses.
If setting to a node's FQDN, they must have a corresponding PTR record in DNS.
If setting to a node's IP address, specify it as XXX.XXX.XXX.XXX/32.
For example:
repmgr['trust_auth_cidr_addresses'] = %w(192.168.1.44/32 db2.example.com)
MD5 Authentication
If you are running on an untrusted network, repmgr can use md5 authentication with a .pgpass file to authenticate.
You can specify by IP address, FQDN, or by subnet, using the same format as in the previous section:
- On the current master node, create a password for the
gitlabandgitlab_repmgruser:
sh
   gitlab-psql -d template1
   template1=# \password gitlab_repmgr
   Enter password: ****
   Confirm password: ****
   template1=# \password gitlab
-
On each database node:
-
Edit
/etc/gitlab/gitlab.rb:- Ensure
repmgr['trust_auth_cidr_addresses']is not set - Set
postgresql['md5_auth_cidr_addresses']to the desired value - Set
postgresql['sql_replication_user'] = 'gitlab_repmgr' - Reconfigure with
gitlab-ctl reconfigure - Restart PostgreSQL with
gitlab-ctl restart postgresql
- Ensure
-
Create a
.pgpassfile. Enter thegitlab_repmgrpassword twice to when asked:sh gitlab-ctl write-pgpass --user gitlab_repmgr --hostuser gitlab-psql --database '*' -
On each PgBouncer node, edit
/etc/gitlab/gitlab.rb: - Ensure
gitlab_rails['db_password']is set to the plaintext password for thegitlabdatabase user - Reconfigure GitLab for the changes to take effect
Enable Monitoring
Introduced in GitLab 12.0.
If you enable Monitoring, it must be enabled on all database servers.
- Create/edit
/etc/gitlab/gitlab.rband add the following configuration:
```ruby # Enable service discovery for Prometheus consul['monitoring_service_discovery'] = true
# Set the network addresses that the exporters will listen on node_exporter['listen_address'] = '0.0.0.0:9100' postgres_exporter['listen_address'] = '0.0.0.0:9187' ```
- Run
sudo gitlab-ctl reconfigureto compile the configuration.
Troubleshooting
Consul and PostgreSQL changes not taking effect
Due to the potential impacts, gitlab-ctl reconfigure only reloads Consul and PostgreSQL, it will not restart the services. However, not all changes can be activated by reloading.
To restart either service, run gitlab-ctl restart SERVICE
For PostgreSQL, it is usually safe to restart the master node by default. Automatic failover defaults to a 1 minute timeout. Provided the database returns before then, nothing else needs to be done. To be safe, you can stop repmgrd on the standby nodes first with gitlab-ctl stop repmgrd, then start afterwards with gitlab-ctl start repmgrd.
On the Consul server nodes, it is important to restart the Consul service in a controlled fashion. Read our Consul documentation for instructions on how to restart the service.
gitlab-ctl repmgr-check-master command produces errors
If this command displays errors about database permissions it is likely that something failed during
install, resulting in the gitlab-consul database user getting incorrect permissions. Follow these
steps to fix the problem:
- On the master database node, connect to the database prompt -
gitlab-psql -d template1 - Delete the
gitlab-consuluser -DROP USER "gitlab-consul"; - Exit the database prompt -
\q - Reconfigure GitLab and the user will be re-added with the proper permissions.
- Change to the
gitlab-consuluser -su - gitlab-consul - Try the check command again -
gitlab-ctl repmgr-check-master.
Now there should not be errors. If errors still occur then there is another problem.
PgBouncer error ERROR: pgbouncer cannot connect to server
You may get this error when running gitlab-rake gitlab:db:configure or you
may see the error in the PgBouncer log file.
PG::ConnectionBad: ERROR: pgbouncer cannot connect to server
The problem may be that your PgBouncer node's IP address is not included in the
trust_auth_cidr_addresses setting in /etc/gitlab/gitlab.rb on the database nodes.
You can confirm that this is the issue by checking the PostgreSQL log on the master
database node. If you see the following error then trust_auth_cidr_addresses
is the problem.
2018-03-29_13:59:12.11776 FATAL: no pg_hba.conf entry for host "123.123.123.123", user "pgbouncer", database "gitlabhq_production", SSL off
To fix the problem, add the IP address to /etc/gitlab/gitlab.rb.
postgresql['trust_auth_cidr_addresses'] = %w(123.123.123.123/32 <other_cidrs>)
Reconfigure GitLab for the changes to take effect.
Issues with other components
If you're running into an issue with a component not outlined here, be sure to check the troubleshooting section of their specific documentation page.
Configure using Omnibus
Note: We recommend that you follow the instructions here for a full PostgreSQL cluster. If you are reading this section due to an old bookmark, you can find that old documentation in the repository.
Read more on high-availability configuration: