Replication (Geo) (PREMIUM ONLY)
- Introduced in GitLab Enterprise Edition 8.9.
- Using Geo in combination with High Availability is considered Generally Available (GA) in GitLab Premium 10.4.
Replication with Geo is the solution for widely distributed development teams.
Overview
Fetching large repositories can take a long time for teams located far from a single GitLab instance.
Geo provides local, read-only instances of your GitLab instances, reducing the time it takes to clone and fetch large repositories and speeding up development.
NOTE: Note: Check the requirements carefully before setting up Geo.
For a video introduction to Geo, see Introduction to GitLab Geo - GitLab Features.
CAUTION: Caution: Geo undergoes significant changes from release to release. Upgrades are supported and documented, but you should ensure that you're using the right version of the documentation for your installation.
To make sure you're using the right version of the documentation, navigate to the source version of this page on GitLab.com and choose the appropriate release from the Switch branch/tag dropdown. For example, v11.2.3-ee.
Use cases
Implementing Geo provides the following benefits:
- Reduce from minutes to seconds the time taken for your distributed developers to clone and fetch large repositories and projects.
- Enable all of your developers to contribute ideas and work in parallel, no matter where they are.
- Balance the load between your primary and secondary nodes, or offload your automated tests to a secondary node.
In addition, it:
- Can be used for cloning and fetching projects, in addition to reading any data available in the GitLab web interface (see current limitations).
- Overcomes slow connections between distant offices, saving time by improving speed for distributed teams.
- Helps reducing the loading time for automated tasks, custom integrations, and internal workflows.
- Can quickly fail over to a secondary node in a disaster recovery scenario.
- Allows planned failover to a secondary node.
Geo provides:
- Read-only secondary nodes: Maintain one primary GitLab node while still enabling read-only secondary nodes for each of your distributed teams.
- Authentication system hooks: Secondary nodes receives all authentication data (like user accounts and logins) from the primary instance.
- An intuitive UI: Secondary nodes utilize the same web interface your team has grown accustomed to. In addition, there are visual notifications that block write operations and make it clear that a user is on a secondary node.
How it works
Your Geo instance can be used for cloning and fetching projects, in addition to reading any data. This will make working with large repositories over large distances much faster.
When Geo is enabled, the:
- Original instance is known as the primary node.
- Replicated read-only nodes are known as secondary nodes.
Keep in mind that:
- Secondary nodes talk to the primary node to:
- Get user data for logins (API).
- Replicate repositories, LFS Objects, and Attachments (HTTPS + JWT).
- Since GitLab Premium 10.0, the primary node no longer talks to secondary nodes to notify for changes (API).
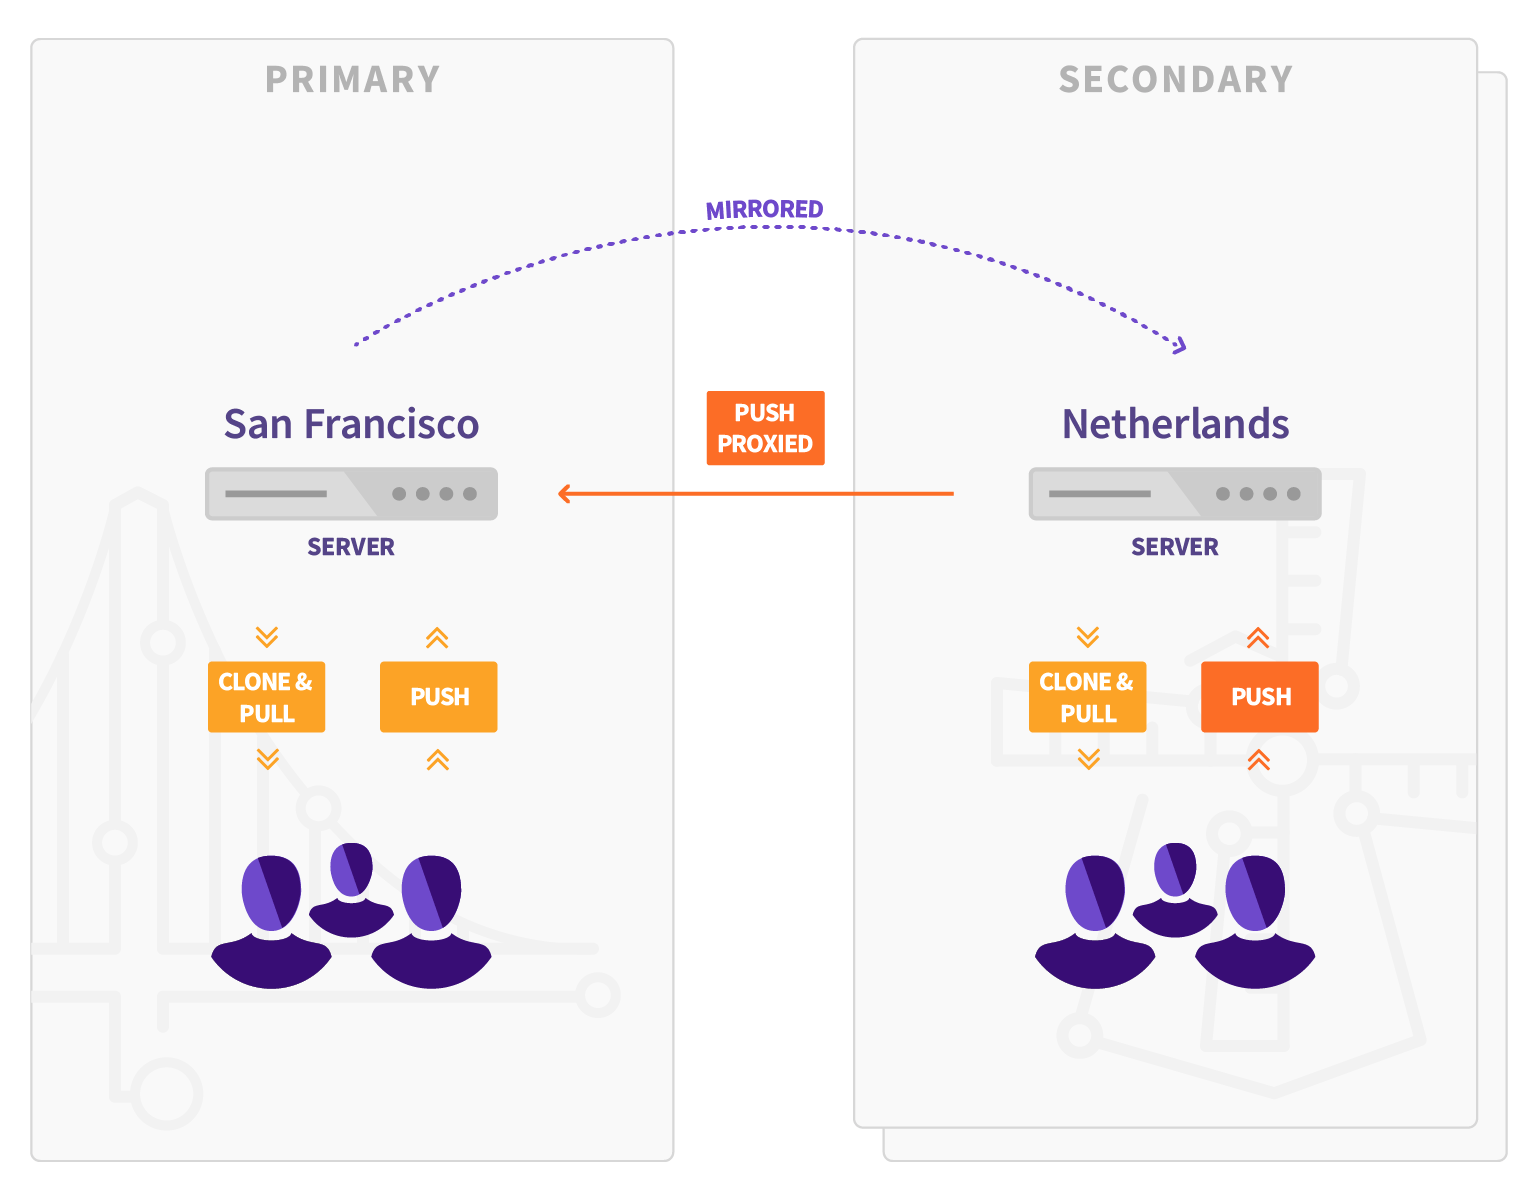
- Pushing directly to a secondary node (for both HTTP and SSH, including Git LFS) was introduced in GitLab Premium 11.3.
- There are limitations in the current implementation.
Architecture
The following diagram illustrates the underlying architecture of Geo.
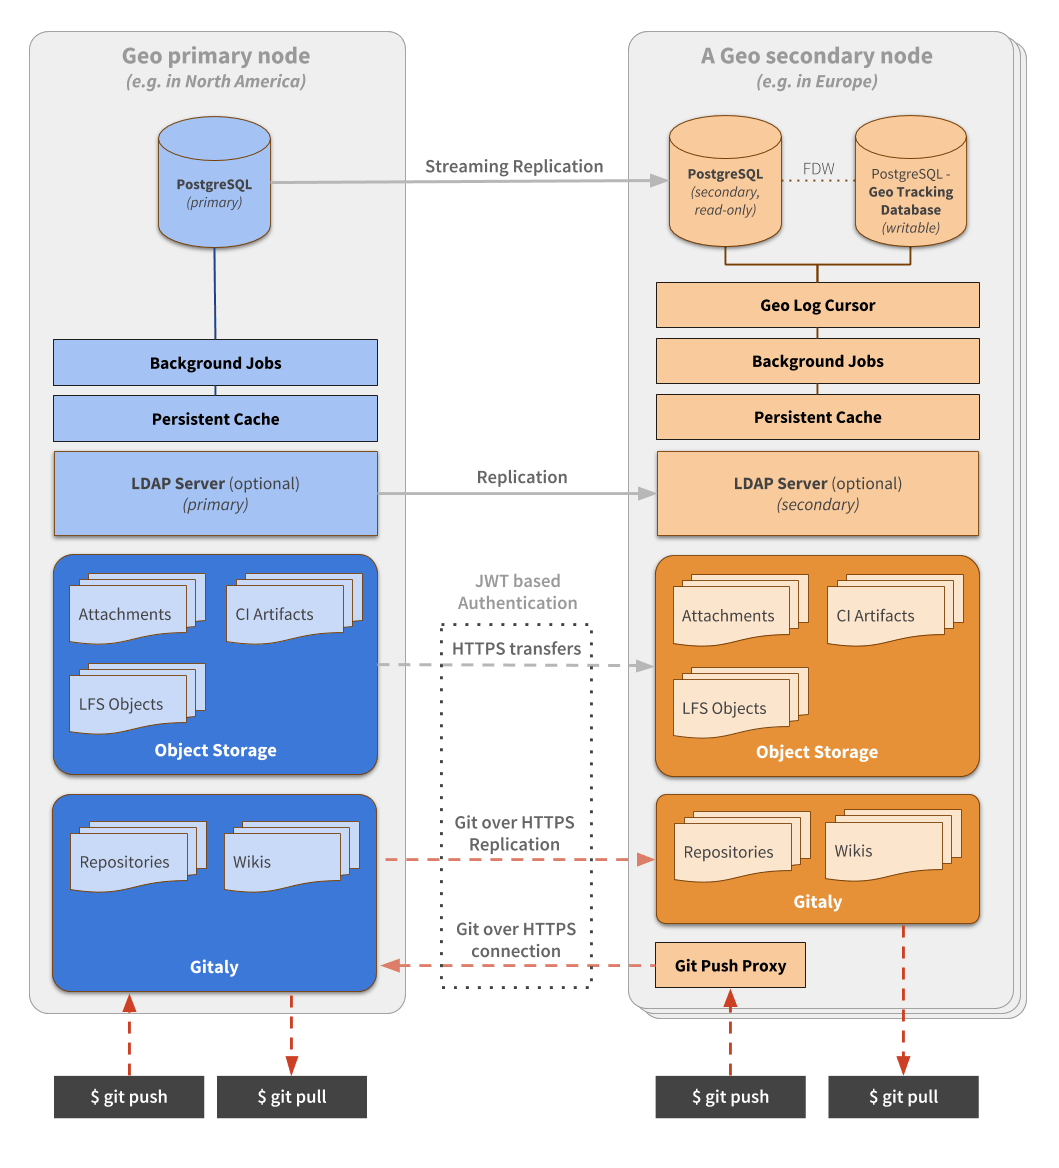
In this diagram:
- There is the primary node and the details of one secondary node.
- Writes to the database can only be performed on the primary node. A secondary node receives database updates via PostgreSQL streaming replication.
- If present, the LDAP server should be configured to replicate for Disaster Recovery scenarios.
- A secondary node performs different type of synchronizations against the primary node, using a special authorization protected by JWT:
- Repositories are cloned/updated via Git over HTTPS.
- Attachments, LFS objects, and other files are downloaded via HTTPS using a private API endpoint.
From the perspective of a user performing Git operations:
- The primary node behaves as a full read-write GitLab instance.
- Secondary nodes are read-only but proxy Git push operations to the primary node. This makes secondary nodes appear to support push operations themselves.
To simplify the diagram, some necessary components are omitted. Note that:
- Git over SSH requires
gitlab-shelland OpenSSH. - Git over HTTPS required
gitlab-workhorse.
Note that a secondary node needs two different PostgreSQL databases:
- A read-only database instance that streams data from the main GitLab database.
- Another database instance used internally by the secondary node to record what data has been replicated.
In secondary nodes, there is an additional daemon: Geo Log Cursor.
Requirements for running Geo
The following are required to run Geo:
- An operating system that supports OpenSSH 6.9+ (needed for fast lookup of authorized SSH keys in the database) The following operating systems are known to ship with a current version of OpenSSH:
- CentOS 7.4+
- Ubuntu 16.04+
- PostgreSQL 9.6+ with FDW support and Streaming Replication
- Git 2.9+
- All nodes must run the same GitLab version.
Additionally, check GitLab's minimum requirements, and we recommend you use:
- At least GitLab Enterprise Edition 10.0 for basic Geo features.
- The latest version for a better experience.
Firewall rules
The following table lists basic ports that must be open between the primary and secondary nodes for Geo.
| Primary node | Secondary node | Protocol |
|---|---|---|
| 80 | 80 | HTTP |
| 443 | 443 | TCP or HTTPS |
| 22 | 22 | TCP |
| 5432 | PostgreSQL |
See the full list of ports used by GitLab in Package defaults
NOTE: Note:
Web terminal support requires your load balancer to correctly handle WebSocket connections.
When using HTTP or HTTPS proxying, your load balancer must be configured to pass through the Connection and Upgrade hop-by-hop headers. See the web terminal integration guide for more details.
NOTE: Note: When using HTTPS protocol for port 443, you will need to add an SSL certificate to the load balancers. If you wish to terminate SSL at the GitLab application server instead, use TCP protocol.
LDAP
We recommend that if you use LDAP on your primary node, you also set up secondary LDAP servers on each secondary node. Otherwise, users will not be able to perform Git operations over HTTP(s) on the secondary node using HTTP Basic Authentication. However, Git via SSH and personal access tokens will still work.
NOTE: Note: It is possible for all secondary nodes to share an LDAP server, but additional latency can be an issue. Also, consider what LDAP server will be available in a disaster recovery scenario if a secondary node is promoted to be a primary node.
Check for instructions on how to set up replication in your LDAP service. Instructions will be different depending on the software or service used. For example, OpenLDAP provides these instructions.
Geo Tracking Database
The tracking database instance is used as metadata to control what needs to be updated on the disk of the local instance. For example:
- Download new assets.
- Fetch new LFS Objects.
- Fetch changes from a repository that has recently been updated.
Because the replicated database instance is read-only, we need this additional database instance for each secondary node.
The tracking database requires the postgres_fdw extension.
Geo Log Cursor
This daemon:
- Reads a log of events replicated by the primary node to the secondary database instance.
- Updates the Geo Tracking Database instance with changes that need to be executed.
When something is marked to be updated in the tracking database instance, asynchronous jobs running on the secondary node will execute the required operations and update the state.
This new architecture allows GitLab to be resilient to connectivity issues between the nodes. It doesn't matter how long the secondary node is disconnected from the primary node as it will be able to replay all the events in the correct order and become synchronized with the primary node again.
Setup instructions
These instructions assume you have a working instance of GitLab. They guide you through:
- Making your existing instance the primary node.
- Adding secondary nodes.
CAUTION: Caution: The steps below should be followed in the order they appear. Make sure the GitLab version is the same on all nodes.
Using Omnibus GitLab
If you installed GitLab using the Omnibus packages (highly recommended):
- Install GitLab Enterprise Edition on the server that will serve as the secondary node. Do not create an account or log in to the new secondary node.
- Upload the GitLab License on the primary node to unlock Geo. The license must be for GitLab Premium or higher.
- Set up the database replication (
primary (read-write) <-> secondary (read-only)topology). - Configure fast lookup of authorized SSH keys in the database. This step is required and needs to be done on both the primary and secondary nodes.
- Configure GitLab to set the primary and secondary nodes.
- Optional: Configure a secondary LDAP server for the secondary node. See notes on LDAP.
- Follow the "Using a Geo Server" guide.
Post-installation documentation
After installing GitLab on the secondary nodes and performing the initial configuration, see the following documentation for post-installation information.
Configuring Geo
For information on configuring Geo, see Geo configuration.
Updating Geo
For information on how to update your Geo nodes to the latest GitLab version, see Updating the Geo nodes.
Configuring Geo high availability
For information on configuring Geo for high availability, see Geo High Availability.
Configuring Geo with Object Storage
For information on configuring Geo with object storage, see Geo with Object storage.
Disaster Recovery
For information on using Geo in disaster recovery situations to mitigate data-loss and restore services, see Disaster Recovery.
Replicating the Container Registry
For more information on how to replicate the Container Registry, see Docker Registry for a secondary node.
Security Review
For more information on Geo security, see Geo security review.
Tuning Geo
For more information on tuning Geo, see Tuning Geo.
Set up a location-aware Git URL
For an example of how to set up a location-aware Git remote URL with AWS Route53, see Location-aware Git remote URL with AWS Route53.
Remove Geo node
For more information on removing a Geo node, see Removing secondary Geo nodes.
Current limitations
CAUTION: Caution: This list of limitations only reflects the latest version of GitLab. If you are using an older version, extra limitations may be in place.
- Pushing directly to a secondary node redirects (for HTTP) or proxies (for SSH) the request to the primary node instead of handling it directly, except when using Git over HTTP with credentials embedded within the URI. For example,
https://user:password@secondary.tld. - The primary node has to be online for OAuth login to happen. Existing sessions and Git are not affected.
- The installation takes multiple manual steps that together can take about an hour depending on circumstances. We are working on improving this experience. See Omnibus GitLab issue #2978 for details.
- Real-time updates of issues/merge requests (for example, via long polling) doesn't work on the secondary node.
- Selective synchronization applies only to files and repositories. Other datasets are replicated to the secondary node in full, making it inappropriate for use as an access control mechanism.
- Object pools for forked project deduplication work only on the primary node, and are duplicated on the secondary node.
- External merge request diffs will not be replicated if they are on-disk, and viewing merge requests will fail. However, external MR diffs in object storage are supported. The default configuration (in-database) does work.
Limitations on replication/verification
You can keep track of the progress to implement the missing items in these epics/issues:
There is a complete list of all GitLab data types and existing support for replication and verification.
Frequently Asked Questions
For answers to common questions, see the Geo FAQ.
Log files
Since GitLab 9.5, Geo stores structured log messages in a geo.log file. For Omnibus installations, this file is at /var/log/gitlab/gitlab-rails/geo.log.
This file contains information about when Geo attempts to sync repositories and files. Each line in the file contains a separate JSON entry that can be ingested into Elasticsearch, Splunk, etc.
For example:
{"severity":"INFO","time":"2017-08-06T05:40:16.104Z","message":"Repository update","project_id":1,"source":"repository","resync_repository":true,"resync_wiki":true,"class":"Gitlab::Geo::LogCursor::Daemon","cursor_delay_s":0.038}
This message shows that Geo detected that a repository update was needed for project 1.
Troubleshooting
For troubleshooting steps, see Geo Troubleshooting.