GitLab Pages administration
- Introduced in GitLab EE 8.3.
- Custom CNAMEs with TLS support were introduced in GitLab EE 8.5.
- GitLab Pages was ported to Community Edition in GitLab 8.17.
- Support for subgroup project's websites was introduced in GitLab 11.8.
GitLab Pages allows for hosting of static sites. It must be configured by an administrator. Separate user documentation is available.
NOTE: Note: This guide is for Omnibus GitLab installations. If you have installed GitLab from source, see GitLab Pages administration for source installations.
Overview
GitLab Pages makes use of the GitLab Pages daemon, a simple HTTP server written in Go that can listen on an external IP address and provide support for custom domains and custom certificates. It supports dynamic certificates through SNI and exposes pages using HTTP2 by default. You are encouraged to read its README to fully understand how it works.
In the case of custom domains (but not
wildcard domains), the Pages daemon needs to listen on
ports 80 and/or 443. For that reason, there is some flexibility in the way
which you can set it up:
- Run the Pages daemon in the same server as GitLab, listening on a secondary IP.
- Run the Pages daemon in a separate server. In that case, the Pages path must also be present in the server that the Pages daemon is installed, so you will have to share it via network.
- Run the Pages daemon in the same server as GitLab, listening on the same IP but on different ports. In that case, you will have to proxy the traffic with a loadbalancer. If you choose that route note that you should use TCP load balancing for HTTPS. If you use TLS-termination (HTTPS-load balancing) the pages will not be able to be served with user provided certificates. For HTTP it's OK to use HTTP or TCP load balancing.
In this document, we will proceed assuming the first option. If you are not supporting custom domains a secondary IP is not needed.
Prerequisites
Before proceeding with the Pages configuration, you will need to:
- Have an exclusive root domain for serving GitLab Pages. Note that you cannot use a subdomain of your GitLab's instance domain.
- Configure a wildcard DNS record.
- (Optional) Have a wildcard certificate for that domain if you decide to serve Pages under HTTPS.
- (Optional but recommended) Enable Shared runners so that your users don't have to bring their own.
- (Only for custom domains) Have a secondary IP.
NOTE: Note: If your GitLab instance and the Pages daemon are deployed in a private network or behind a firewall, your GitLab Pages websites will only be accessible to devices/users that have access to the private network.
Add the domain to the Public Suffix List
The Public Suffix List is used by browsers to
decide how to treat subdomains. If your GitLab instance allows members of the
public to create GitLab Pages sites, it also allows those users to create
subdomains on the pages domain (example.io). Adding the domain to the Public
Suffix List prevents browsers from accepting
supercookies,
among other things.
Follow these instructions to submit your
GitLab Pages subdomain. For instance, if your domain is example.io, you should
request that example.io is added to the Public Suffix List. GitLab.com
added gitlab.io in 2016.
DNS configuration
GitLab Pages expect to run on their own virtual host. In your DNS server/provider you need to add a wildcard DNS A record pointing to the host that GitLab runs. For example, an entry would look like this:
*.example.io. 1800 IN A    192.0.2.1
*.example.io. 1800 IN AAAA 2001::1
where example.io is the domain under which GitLab Pages will be served
and 192.0.2.1 is the IPv4 address of your GitLab instance and 2001::1 is the
IPv6 address. If you don't have IPv6, you can omit the AAAA record.
NOTE: Note: You should not use the GitLab domain to serve user pages. For more information see the security section.
Configuration
Depending on your needs, you can set up GitLab Pages in 4 different ways. The following options are listed from the easiest setup to the most advanced one. The absolute minimum requirement is to set up the wildcard DNS since that is needed in all configurations.
Wildcard domains
Requirements:
URL scheme: http://page.example.io
This is the minimum setup that you can use Pages with. It is the base for all other setups as described below. NGINX will proxy all requests to the daemon. The Pages daemon doesn't listen to the outside world.
- Set the external URL for GitLab Pages in
/etc/gitlab/gitlab.rb:
ruby
   pages_external_url 'http://example.io'
Watch the video tutorial for this configuration.
Wildcard domains with TLS support
Requirements:
- Wildcard DNS setup
- Wildcard TLS certificate
URL scheme: https://page.example.io
NGINX will proxy all requests to the daemon. Pages daemon doesn't listen to the outside world.
- Place the certificate and key inside
/etc/gitlab/ssl - In
/etc/gitlab/gitlab.rbspecify the following configuration:
```ruby pages_external_url 'https://example.io'
pages_nginx['redirect_http_to_https'] = true pages_nginx['ssl_certificate'] = "/etc/gitlab/ssl/pages-nginx.crt" pages_nginx['ssl_certificate_key'] = "/etc/gitlab/ssl/pages-nginx.key" ```
where pages-nginx.crt and pages-nginx.key are the SSL cert and key,
respectively.
Additional configuration for Docker container
The GitLab Pages daemon will not have permissions to bind mounts when it runs in a Docker container. To overcome this issue you'll need to change the chroot behavior:
- Edit
/etc/gitlab/gitlab.rb. - Set the
inplace_chroottotruefor GitLab Pages:
ruby
   gitlab_pages['inplace_chroot'] = true
NOTE: Note:
inplace_chroot option might not work with the other features, such as Pages Access Control.
The GitLab Pages README has more information about caveats and workarounds.
Advanced configuration
In addition to the wildcard domains, you can also have the option to configure GitLab Pages to work with custom domains. Again, there are two options here: support custom domains with and without TLS certificates. The easiest setup is that without TLS certificates. In either case, you'll need a secondary IP. If you have IPv6 as well as IPv4 addresses, you can use them both.
Custom domains
Requirements:
- Wildcard DNS setup
- Secondary IP
URL scheme: http://page.example.io and http://domain.com
In that case, the Pages daemon is running, NGINX still proxies requests to the daemon but the daemon is also able to receive requests from the outside world. Custom domains are supported, but no TLS.
- Edit
/etc/gitlab/gitlab.rb:
ruby
   pages_external_url "http://example.io"
   nginx['listen_addresses'] = ['192.0.2.1']
   pages_nginx['enable'] = false
   gitlab_pages['external_http'] = ['192.0.2.2:80', '[2001::2]:80']
where 192.0.2.1 is the primary IP address that GitLab is listening to and
192.0.2.2 and 2001::2 are the secondary IPs the GitLab Pages daemon
listens on. If you don't have IPv6, you can omit the IPv6 address.
Custom domains with TLS support
Requirements:
- Wildcard DNS setup
- Wildcard TLS certificate
- Secondary IP
URL scheme: https://page.example.io and https://domain.com
In that case, the Pages daemon is running, NGINX still proxies requests to the daemon but the daemon is also able to receive requests from the outside world. Custom domains and TLS are supported.
- Edit
/etc/gitlab/gitlab.rb:
ruby
   pages_external_url "https://example.io"
   nginx['listen_addresses'] = ['192.0.2.1']
   pages_nginx['enable'] = false
   gitlab_pages['cert'] = "/etc/gitlab/ssl/example.io.crt"
   gitlab_pages['cert_key'] = "/etc/gitlab/ssl/example.io.key"
   gitlab_pages['external_http'] = ['192.0.2.2:80', '[2001::2]:80']
   gitlab_pages['external_https'] = ['192.0.2.2:443', '[2001::2]:443']
where 192.0.2.1 is the primary IP address that GitLab is listening to and
192.0.2.2 and 2001::2 are the secondary IPs where the GitLab Pages daemon
listens on. If you don't have IPv6, you can omit the IPv6 address.
Custom domain verification
To prevent malicious users from hijacking domains that don't belong to them, GitLab supports custom domain verification. When adding a custom domain, users will be required to prove they own it by adding a GitLab-controlled verification code to the DNS records for that domain.
If your userbase is private or otherwise trusted, you can disable the verification requirement. Navigate to Admin Area > Settings > Preferences and uncheck Require users to prove ownership of custom domains in the Pages section. This setting is enabled by default.
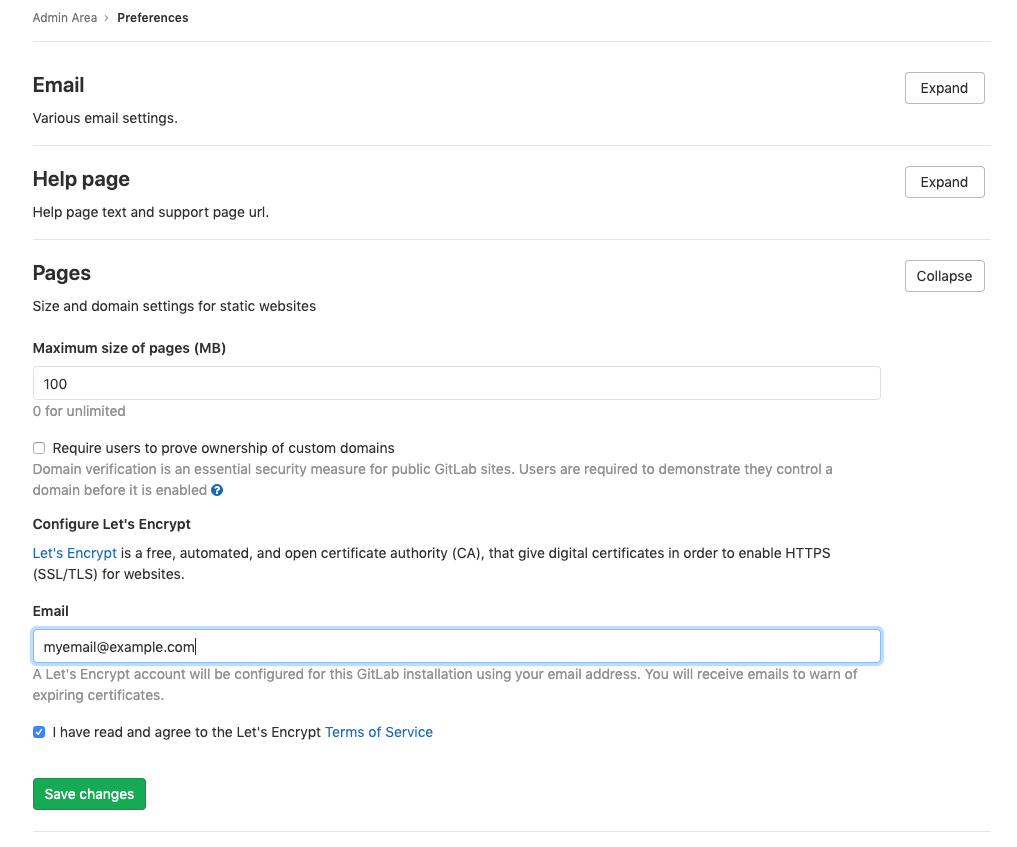
Let's Encrypt integration
Introduced in GitLab 12.1.
GitLab Pages' Let's Encrypt integration allows users to add Let's Encrypt SSL certificates for GitLab Pages sites served under a custom domain.
To enable it, you'll need to:
- Choose an email on which you will receive notifications about expiring domains.
- Navigate to your instance's Admin Area > Settings > Preferences and expand Pages settings.
- Enter the email for receiving notifications and accept Let's Encrypt's Terms of Service as shown below.
- Click Save changes.
Access control
Introduced in GitLab 11.5.
GitLab Pages access control can be configured per-project, and allows access to a Pages site to be controlled based on a user's membership to that project.
Access control works by registering the Pages daemon as an OAuth application with GitLab. Whenever a request to access a private Pages site is made by an unauthenticated user, the Pages daemon redirects the user to GitLab. If authentication is successful, the user is redirected back to Pages with a token, which is persisted in a cookie. The cookies are signed with a secret key, so tampering can be detected.
Each request to view a resource in a private site is authenticated by Pages using that token. For each request it receives, it makes a request to the GitLab API to check that the user is authorized to read that site.
Pages access control is disabled by default. To enable it:
- Enable it in
/etc/gitlab/gitlab.rb:
ruby
   gitlab_pages['access_control'] = true
- Reconfigure GitLab.
- Users can now configure it in their projects' settings.
Running behind a proxy
Like the rest of GitLab, Pages can be used in those environments where external internet connectivity is gated by a proxy. In order to use a proxy for GitLab pages:
- Configure in
/etc/gitlab/gitlab.rb:
ruby
   gitlab_pages['http_proxy'] = 'http://example:8080'
- Reconfigure GitLab for the changes to take effect.
Using a custom Certificate Authority (CA) with Access Control
When using certificates issued by a custom CA, Access Control on GitLab Pages may fail to work if the custom CA is not recognized.
This usually results in this error:
Post /oauth/token: x509: certificate signed by unknown authority.
For GitLab Pages Access Control with TLS/SSL certs issued by an internal or custom CA:
-
Copy the certificate bundle to
/opt/gitlab/embedded/ssl/certs/in.pemformat. -
Restart the GitLab Pages Daemon. For GitLab Omnibus instances:
bash
sudo gitlab-ctl restart gitlab-pages
Activate verbose logging for daemon
Verbose logging was introduced in Omnibus GitLab 11.1.
Follow the steps below to configure verbose logging of GitLab Pages daemon.
- By default the daemon only logs with
INFOlevel. If you wish to make it log events with levelDEBUGyou must configure this in/etc/gitlab/gitlab.rb:
ruby
   gitlab_pages['log_verbose'] = true
Change storage path
Follow the steps below to change the default path where GitLab Pages' contents are stored.
- Pages are stored by default in
/var/opt/gitlab/gitlab-rails/shared/pages. If you wish to store them in another location you must set it up in/etc/gitlab/gitlab.rb:
ruby
   gitlab_rails['pages_path'] = "/mnt/storage/pages"
Configure listener for reverse proxy requests
Follow the steps below to configure the proxy listener of GitLab Pages. Introduced in Omnibus GitLab 11.1.
- By default the listener is configured to listen for requests on
localhost:8090.
If you wish to disable it you must configure this in
/etc/gitlab/gitlab.rb:
ruby
   gitlab_pages['listen_proxy'] = nil
If you wish to make it listen on a different port you must configure this also in
/etc/gitlab/gitlab.rb:
ruby
   gitlab_pages['listen_proxy'] = "localhost:10080"
Set maximum pages size
You can configure the maximum size of the unpacked archive per project in Admin Area > Settings > Preferences > Pages, in Maximum size of pages (MB). The default is 100MB.
Override maximum pages size per project or group (PREMIUM ONLY)
Introduced in GitLab 12.7.
To override the global maximum pages size for a specific project:
- Navigate to your project's Settings > Pages page.
- Edit the Maximum size of pages.
- Click Save changes.
To override the global maximum pages size for a specific group:
- Navigate to your group's Settings > General page and expand Pages.
- Edit the Maximum size of pages.
- Click Save changes.
Running GitLab Pages on a separate server
You can run the GitLab Pages daemon on a separate server in order to decrease the load on your main application server.
To configure GitLab Pages on a separate server:
-
Set up a new server. This will become the Pages server.
-
Create an NFS share on the new server and configure this share to allow access from your main GitLab server. For this example, we use the default GitLab Pages folder
/var/opt/gitlab/gitlab-rails/shared/pagesas the shared folder on the new server and we will mount it to/mnt/pageson the GitLab server. -
On the Pages server, install Omnibus GitLab and modify
/etc/gitlab/gitlab.rbto include:
ruby
   external_url 'http://<ip-address-of-the-server>'
   pages_external_url "http://<your-pages-server-URL>"
   postgresql['enable'] = false
   redis['enable'] = false
   prometheus['enable'] = false
   unicorn['enable'] = false
   sidekiq['enable'] = false
   gitlab_workhorse['enable'] = false
   gitaly['enable'] = false
   alertmanager['enable'] = false
   node_exporter['enable'] = false
   gitlab_rails['auto_migrate'] = false
-
Reconfigure GitLab for the changes to take effect.
-
On the GitLab server, make the following changes to
/etc/gitlab/gitlab.rb:
ruby
   gitlab_pages['enable'] = false
   pages_external_url "http://<your-pages-server-URL>"
   gitlab_rails['pages_path'] = "/mnt/pages"
- Reconfigure GitLab for the changes to take effect.
It is possible to run GitLab Pages on multiple servers if you wish to distribute the load. You can do this through standard load balancing practices such as configuring your DNS server to return multiple IPs for your Pages server, configuring a load balancer to work at the IP level, and so on. If you wish to set up GitLab Pages on multiple servers, perform the above procedure for each Pages server.
Access control when running GitLab Pages on a separate server
If you are running GitLab Pages on a separate server, then you must use the following procedure to configure access control:
- On the GitLab server, add the following to
/etc/gitlab/gitlab.rb:
ruby
   gitlab_pages['enable'] = true
   gitlab_pages['access_control'] = true
- Reconfigure GitLab for the
changes to take effect. The
gitlab-secrets.jsonfile is now updated with the new configuration.
DANGER: Danger:
The gitlab-secrets.json file contains secrets that control database encryption.
Do not edit or replace this file on the GitLab server or you might
experience permanent data loss. Make a backup copy of this file before proceeding,
as explained in the following steps.
- Create a backup of the secrets file on the GitLab server:
shell
   cp /etc/gitlab/gitlab-secrets.json /etc/gitlab/gitlab-secrets.json.bak
- Create a backup of the secrets file on the Pages server:
shell
   cp /etc/gitlab/gitlab-secrets.json /etc/gitlab/gitlab-secrets.json.bak
- Disable Pages on the GitLab server by setting the following in
/etc/gitlab/gitlab.rb:
ruby
   gitlab_pages['enable'] = false
-
Reconfigure GitLab for the changes to take effect.
-
Copy the
/etc/gitlab/gitlab-secrets.jsonfile from the GitLab server to the Pages server. -
On your Pages server, add the following to
/etc/gitlab/gitlab.rb:
ruby
   gitlab_pages['gitlab_server'] = "https://<your-gitlab-server-URL>"
   gitlab_pages['access_control'] = true
- Reconfigure GitLab for the changes to take effect.
Backup
GitLab Pages are part of the regular backup, so there is no separate backup to configure.
Security
You should strongly consider running GitLab Pages under a different hostname than GitLab to prevent XSS attacks.