Kubernetes clusters
- Introduced in GitLab 10.1 for projects.
- Introduced in GitLab 11.6 for groups.
- Introduced in GitLab 11.11 for instances.
GitLab provides many features with a Kubernetes integration. Kubernetes can be integrated with projects, but also:
NOTE: Scalable app deployment with GitLab and Google Cloud Platform Watch the webcast and learn how to spin up a Kubernetes cluster managed by Google Cloud Platform (GCP) in a few clicks.
Overview
Using the GitLab project Kubernetes integration, you can:
- Use Review Apps.
- Run pipelines.
- Deploy your applications.
- Detect and monitor Kubernetes.
- Use it with Auto DevOps.
- Use Web terminals.
- Use Deploy Boards. (PREMIUM)
- Use Canary Deployments. (PREMIUM)
- View Pod logs. (ULTIMATE)
- Run serverless workloads on Kubernetes with Knative.
Deploy Boards (PREMIUM)
GitLab's Deploy Boards offer a consolidated view of the current health and status of each CI environment running on Kubernetes, displaying the status of the pods in the deployment. Developers and other teammates can view the progress and status of a rollout, pod by pod, in the workflow they already use without any need to access Kubernetes.
Canary Deployments (PREMIUM)
Leverage Kubernetes' Canary deployments and visualize your canary deployments right inside the Deploy Board, without the need to leave GitLab.
Read more about Canary Deployments
Pod logs (ULTIMATE)
GitLab makes it easy to view the logs of running pods in connected Kubernetes clusters. By displaying the logs directly in GitLab, developers can avoid having to manage console tools or jump to a different interface.
Read more about Kubernetes pod logs
Kubernetes monitoring
Automatically detect and monitor Kubernetes metrics. Automatic monitoring of NGINX Ingress is also supported.
Read more about Kubernetes monitoring
Auto DevOps
Auto DevOps automatically detects, builds, tests, deploys, and monitors your applications.
To make full use of Auto DevOps(Auto Deploy, Auto Review Apps, and Auto Monitoring) you will need the Kubernetes project integration enabled.
NOTE: Note Kubernetes clusters can be used without Auto DevOps.
Web terminals
Introduced in GitLab 8.15.
When enabled, the Kubernetes service adds web terminal
support to your environments. This is based on the exec functionality found in
Docker and Kubernetes, so you get a new shell session within your existing
containers. To use this integration, you should deploy to Kubernetes using
the deployment variables above, ensuring any deployments, replica sets, and
pods are annotated with:
app.gitlab.com/env: $CI_ENVIRONMENT_SLUGapp.gitlab.com/app: $CI_PROJECT_PATH_SLUG
$CI_ENVIRONMENT_SLUG and $CI_PROJECT_PATH_SLUG are the values of
the CI variables.
You must be the project owner or have maintainer permissions to use terminals. Support is limited
to the first container in the first pod of your environment.
Adding and removing clusters
See Adding and removing Kubernetes clusters for details on how to set up integrations with Google Cloud Platform (GCP) and Amazon Elastic Kubernetes Service (EKS).
Cluster configuration
After adding a Kubernetes cluster to GitLab, read this section that covers important considerations for configuring Kubernetes clusters with GitLab.
Security implications
CAUTION: Important: The whole cluster security is based on a model where developers are trusted, so only trusted users should be allowed to control your clusters.
The default cluster configuration grants access to a wide set of functionalities needed to successfully build and deploy a containerized application. Bear in mind that the same credentials are used for all the applications running on the cluster.
GitLab-managed clusters
- Introduced in GitLab 11.5.
- Became optional in GitLab 11.11.
You can choose to allow GitLab to manage your cluster for you. If your cluster is managed by GitLab, resources for your projects will be automatically created. See the Access controls section for details on which resources will be created.
If you choose to manage your own cluster, project-specific resources will not be created
automatically. If you are using Auto DevOps, you will
need to explicitly provide the KUBE_NAMESPACE deployment variable
that will be used by your deployment jobs, otherwise a namespace will be created for you.
Important notes
Note the following with GitLab and clusters:
- If you install applications on your cluster, GitLab will create the resources required to run these even if you have chosen to manage your own cluster.
- Be aware that manually managing resources that have been created by GitLab, like namespaces and service accounts, can cause unexpected errors. If this occurs, try clearing the cluster cache.
Clearing the cluster cache
Introduced in GitLab 12.6.
If you choose to allow GitLab to manage your cluster for you, GitLab stores a cached version of the namespaces and service accounts it creates for your projects. If you modify these resources in your cluster manually, this cache can fall out of sync with your cluster, which can cause deployment jobs to fail.
To clear the cache:
- Navigate to your project’s Operations > Kubernetes page, and select your cluster.
- Expand the Advanced settings section.
- Click Clear cluster cache.
Base domain
Introduced in GitLab 11.8.
NOTE: Note: You do not need to specify a base domain on cluster settings when using GitLab Serverless. The domain in that case will be specified as part of the Knative installation. See Installing Applications.
Specifying a base domain will automatically set KUBE_INGRESS_BASE_DOMAIN as an environment variable.
If you are using Auto DevOps, this domain will be used for the different
stages. For example, Auto Review Apps and Auto Deploy.
The domain should have a wildcard DNS configured to the Ingress IP address. After Ingress has been installed (see Installing Applications), you can either:
- Create an
Arecord that points to the Ingress IP address with your domain provider. - Enter a wildcard DNS address using a service such as nip.io or xip.io. For example,
192.168.1.1.xip.io.
Setting the environment scope (PREMIUM)
When adding more than one Kubernetes cluster to your project, you need to differentiate them with an environment scope. The environment scope associates clusters with environments similar to how the environment-specific variables work.
The default environment scope is *, which means all jobs, regardless of their
environment, will use that cluster. Each scope can only be used by a single
cluster in a project, and a validation error will occur if otherwise.
Also, jobs that don't have an environment keyword set will not be able to access any cluster.
For example, let's say the following Kubernetes clusters exist in a project:
| Cluster | Environment scope |
|---|---|
| Development | * |
| Production | production |
And the following environments are set in
.gitlab-ci.yml:
stages:
- test
- deploy

test:
  stage: test
  script: sh test

deploy to staging:
  stage: deploy
  script: make deploy
  environment:
    name: staging
    url: https://staging.example.com/

deploy to production:
  stage: deploy
  script: make deploy
  environment:
    name: production
    url: https://example.com/
The result will then be:
- The Development cluster details will be available in the
deploy to stagingjob. - The production cluster details will be available in the
deploy to productionjob. - No cluster details will be available in the
testjob because it doesn't define any environment.
Multiple Kubernetes clusters (PREMIUM)
Introduced in GitLab Premium 10.3.
With GitLab Premium, you can associate more than one Kubernetes cluster to your project. That way you can have different clusters for different environments, like dev, staging, production, etc.
Simply add another cluster, like you did the first time, and make sure to set an environment scope that will differentiate the new cluster with the rest.
Installing applications
GitLab can install and manage some applications like Helm, GitLab Runner, Ingress, Prometheus, etc., in your project-level cluster. For more information on installing, upgrading, uninstalling, and troubleshooting applications for your project cluster, see GitLab Managed Apps.
Deploying to a Kubernetes cluster
A Kubernetes cluster can be the destination for a deployment job. If
- The cluster is integrated with GitLab, special
deployment variables are made available to your job
and configuration is not required. You can immediately begin interacting with
the cluster from your jobs using tools such as
kubectlorhelm. - You don't use GitLab's cluster integration you can still deploy to your cluster. However, you will need configure Kubernetes tools yourself using environment variables before you can interact with the cluster from your jobs.
Deployment variables
The Kubernetes cluster integration exposes the following deployment variables in the GitLab CI/CD build environment.
| Variable | Description |
|---|---|
KUBE_URL |
Equal to the API URL. |
KUBE_TOKEN |
The Kubernetes token of the environment service account. |
KUBE_NAMESPACE |
The namespace associated with the project's deployment service account. In the format <project_name>-<project_id>-<environment>. For GitLab-managed clusters, a matching namespace is automatically created by GitLab in the cluster. |
KUBE_CA_PEM_FILE |
Path to a file containing PEM data. Only present if a custom CA bundle was specified. |
KUBE_CA_PEM |
(deprecated) Raw PEM data. Only if a custom CA bundle was specified. |
KUBECONFIG |
Path to a file containing kubeconfig for this deployment. CA bundle would be embedded if specified. This config also embeds the same token defined in KUBE_TOKEN so you likely will only need this variable. This variable name is also automatically picked up by kubectl so you won't actually need to reference it explicitly if using kubectl. |
KUBE_INGRESS_BASE_DOMAIN |
From GitLab 11.8, this variable can be used to set a domain per cluster. See cluster domains for more information. |
NOTE: NOTE:
Prior to GitLab 11.5, KUBE_TOKEN was the Kubernetes token of the main
service account of the cluster integration.
NOTE: Note:
If your cluster was created before GitLab 12.2, default KUBE_NAMESPACE will be set to <project_name>-<project_id>.
When deploying a custom namespace:
- The custom namespace must exist in your cluster.
- The project's deployment service account must have permission to deploy to the namespace.
KUBECONFIGmust be updated to use the custom namespace instead of the GitLab-provided default (this is not automatic).- If deploying with Auto DevOps, you must also override
KUBE_NAMESPACEwith the custom namespace.
CAUTION: Caution: GitLab does not save custom namespaces in the database. So while deployments work with custom namespaces, GitLab's integration for already-deployed environments will not pick up the customized values. For example, Deploy Boards will not work as intended for those deployments. For more information, see the related issue.
Troubleshooting
Before the deployment jobs starts, GitLab creates the following specifically for the deployment job:
- A namespace.
- A service account.
However, sometimes GitLab can not create them. In such instances, your job will fail with the message:
This job failed because the necessary resources were not successfully created.
To find the cause of this error when creating a namespace and service account, check the logs.
Reasons for failure include:
- The token you gave GitLab does not have
cluster-adminprivileges required by GitLab. - Missing
KUBECONFIGorKUBE_TOKENvariables. To be passed to your job, they must have a matchingenvironment:name. If your job has noenvironment:nameset, it will not be passed the Kubernetes credentials.
NOTE: NOTE: Project-level clusters upgraded from GitLab 12.0 or older may be configured in a way that causes this error. Ensure you deselect the GitLab-managed cluster option if you want to manage namespaces and service accounts yourself.
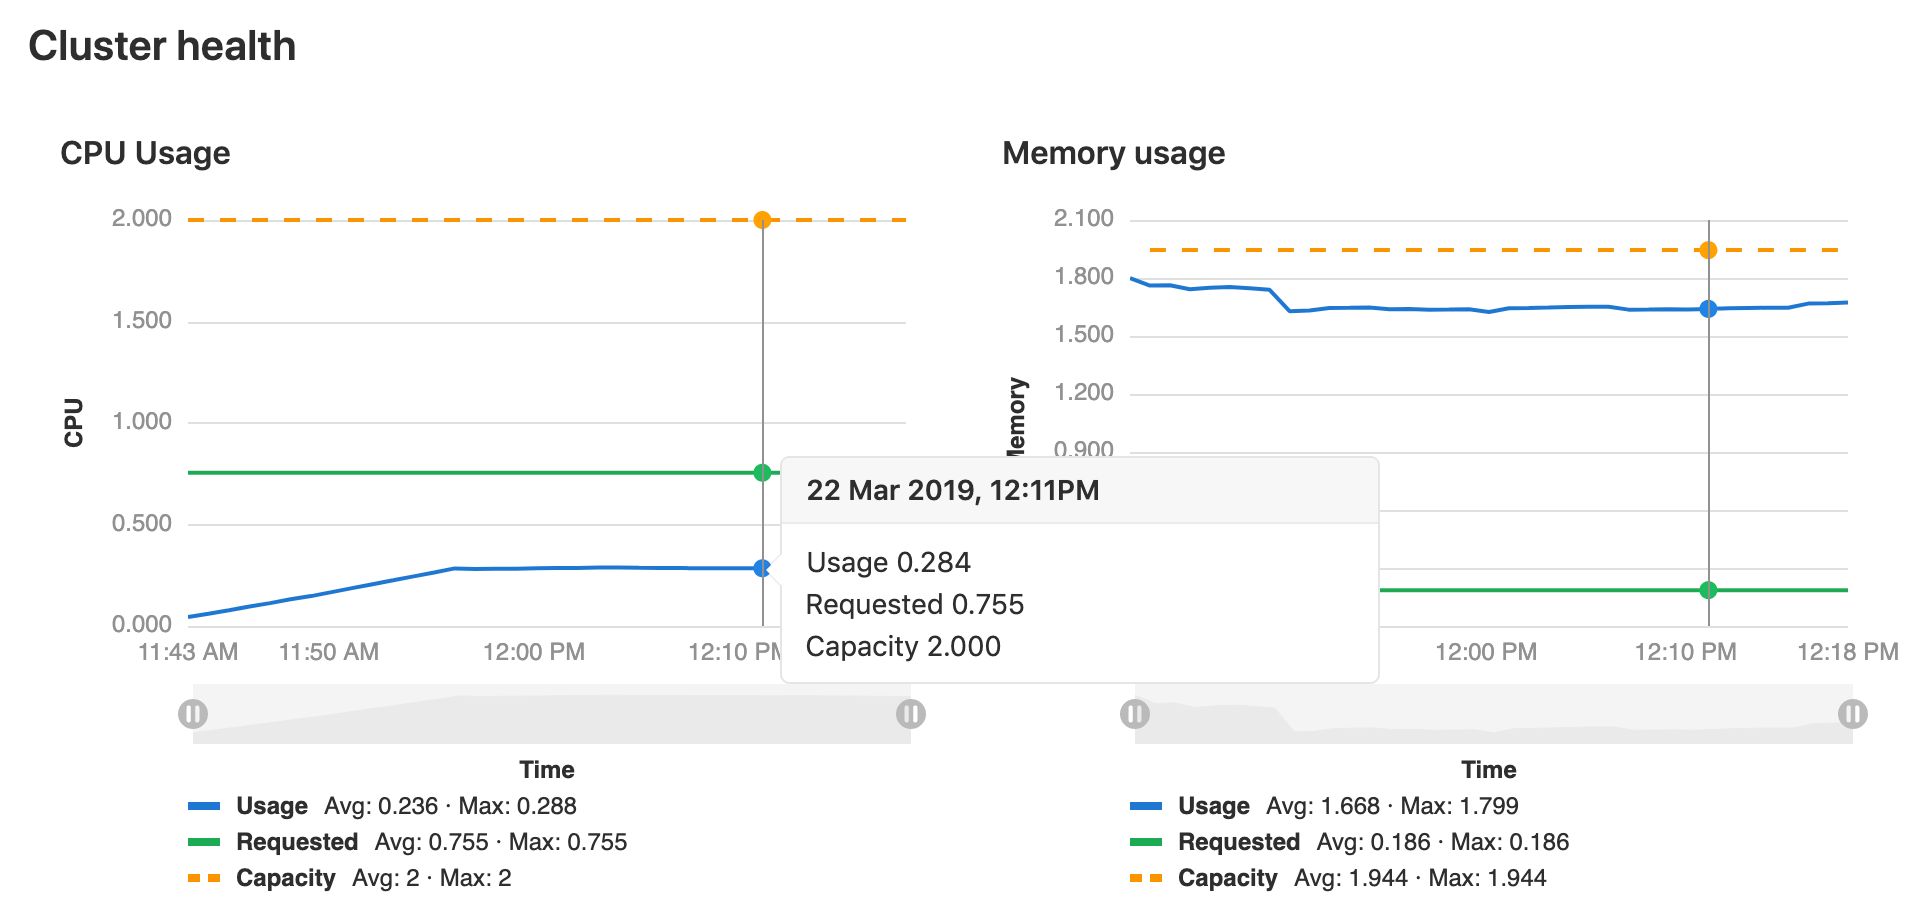
Monitoring your Kubernetes cluster (ULTIMATE)
Introduced in GitLab Ultimate 10.6.
When Prometheus is deployed, GitLab will automatically monitor the cluster's health. At the top of the cluster settings page, CPU and Memory utilization is displayed, along with the total amount available. Keeping an eye on cluster resources can be important, if the cluster runs out of memory pods may be shutdown or fail to start.